Introduction to Low Code integrations
In the original post from this series, we looked at the core of our built-in enterprise integration framework, with special focus on the definition of Integration Entries and the high-level explanation on how the integration pipeline operates.
The post’s content was based on perhaps the most frequent system integration example we observe in CM MES implementations: using the GenericIntegrationHandler integration package and handle the integration logic using DEE Actions, each responsible for handling specific message types.
Since DEE actions are, after all, a collection of C#/.NET code using the CM MES internal framework, they fall in the category of traditional software development. On specific use cases, traditional development might bring some drawbacks:
➡️ Time: Traditional development focuses on manual coding, which is a time-consuming task - even in the age of AI-based code generation tools. Furthermore, time-consuming tasks do not end with just manual coding, because other important phases of software development are closely impacted: code reviews, deployment actions (e.g., new package deployment when an integration is changed or a bug is fixed), etc.
➡️ Technical Knowledge/Skills: It goes without saying that traditional development requires specific expertise in software engineering. In practice, this expertise might result in the need to understand multiple programming languages and respective frameworks and/or libraries. As a consequence, not all parties of an implementation project will be able to actively contribute to these integrations, either by creating new ones from scratch or changing/fixing others.
In certain integration use cases, a low code integration platform could be a viable solution. Low code development can be described as an alternative approach on building software: an approach where little code is required. Instead, the business process is built using visual tools, such as drag-and-drop, pre-built widgets with simple manual coding, only when required. In essence, the user builds a workflow, connecting the different widgets and deciding how the information flows until reaching the end of the execution.
Low code platforms can bring the following advantages when building new integrations:
🚀 Implementation Speed: By offloading implementation logic to pre-built components, the user’s main task becomes building a visual workflow, connecting and configuring the required components so that the business value is reached at the end of the workflow’s execution.
📚 Skills: Since the implementation details are part of the pre-built components, the user would only need to develop code, under certain conditions (e.g., if there is no provided component that fulfills a particular task). For specific simple scenarios, a workflow could be implemented without the need for extra coding. Consequently, users with different backgrounds and roles could contribute for certain interfaces.
🧪 Prototyping/PoC: Considering the two points above, it’s easier to setup a prototype or a proof of concept for new integrations without the need to step into the traditional software development and deployment cycle.
🔁 Reusability: The components that are available to build the low code workflows are reusable, thus avoiding frequent programming issues such as not following the DRY (Don’t Repeat Yourself) principle or creating technical debt.
⚠️ Choose the right tool for the job
The goal of this post is to describe a different approach for implementing integrations in CM MES, not to determine that “A” is better than “B” or vice-versa. In fact, low code solutions can also create new challenges in other areas such as change management and governance, especially in highly regulated segments, such as medical devices. Traditional or low code development are not mutually exclusive and can be used in conjuntion.
In the CM MES ecosystem, there are more examples of low code solutions which you might already be aware of. Connect IoT uses low code workflows to easily setup and build integration scenarios. More recently, a new feature called Business Workflows was implemented and made available, where users can build simple workflows to react to certain events and execute CM MES operations according to their functional requirements.
In the next section, an example will be provided on how to configure, execute and monitor low code workflows in the context of enterprise integrations. At the end we’ll take a closer look at the different technical components in place and how the solution is designed from a high-level standpoint.
Demo: Importing a Production Order
For this demonstration, I wanted to show an example that would be simple to understand, but at the same time would resonate to those actively working in implementation projects with ERP integrations. Taking this into account, in this example we will simulate the creation of a new production order (in this case represented by a Material instance), by receiving this JSON payload:
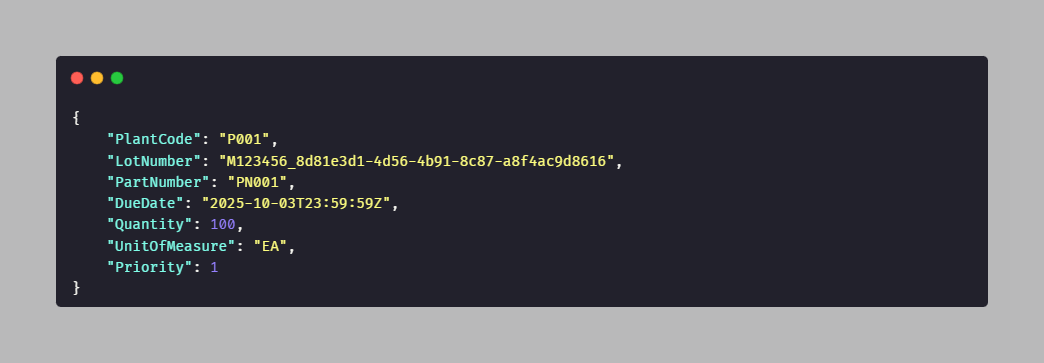
| Field | Description/Mapping |
|---|---|
| PlantCode | A code representing the plant. In this example, the received value must match a custom attribute in the Facility instance. |
| LotNumber | The new material’s name. |
| PartNumber | The Product name. A Product with the same name must exist in CM MES. |
| DueDate | Assigned to the Material’s DueDate property. |
| Quantity | Assigned to the Material’s PrimaryQuantity property. |
| UnitOfMeasure | Assigned to the Material’s PrimaryUnits property. |
| Priority | Assigned to the Material’s Priority property. |
Configuration
First, we need to register our event/payload as an IoTEventDefinition. Create a new instance for scope Enterprise Integration, and enter the properties mentioned above.
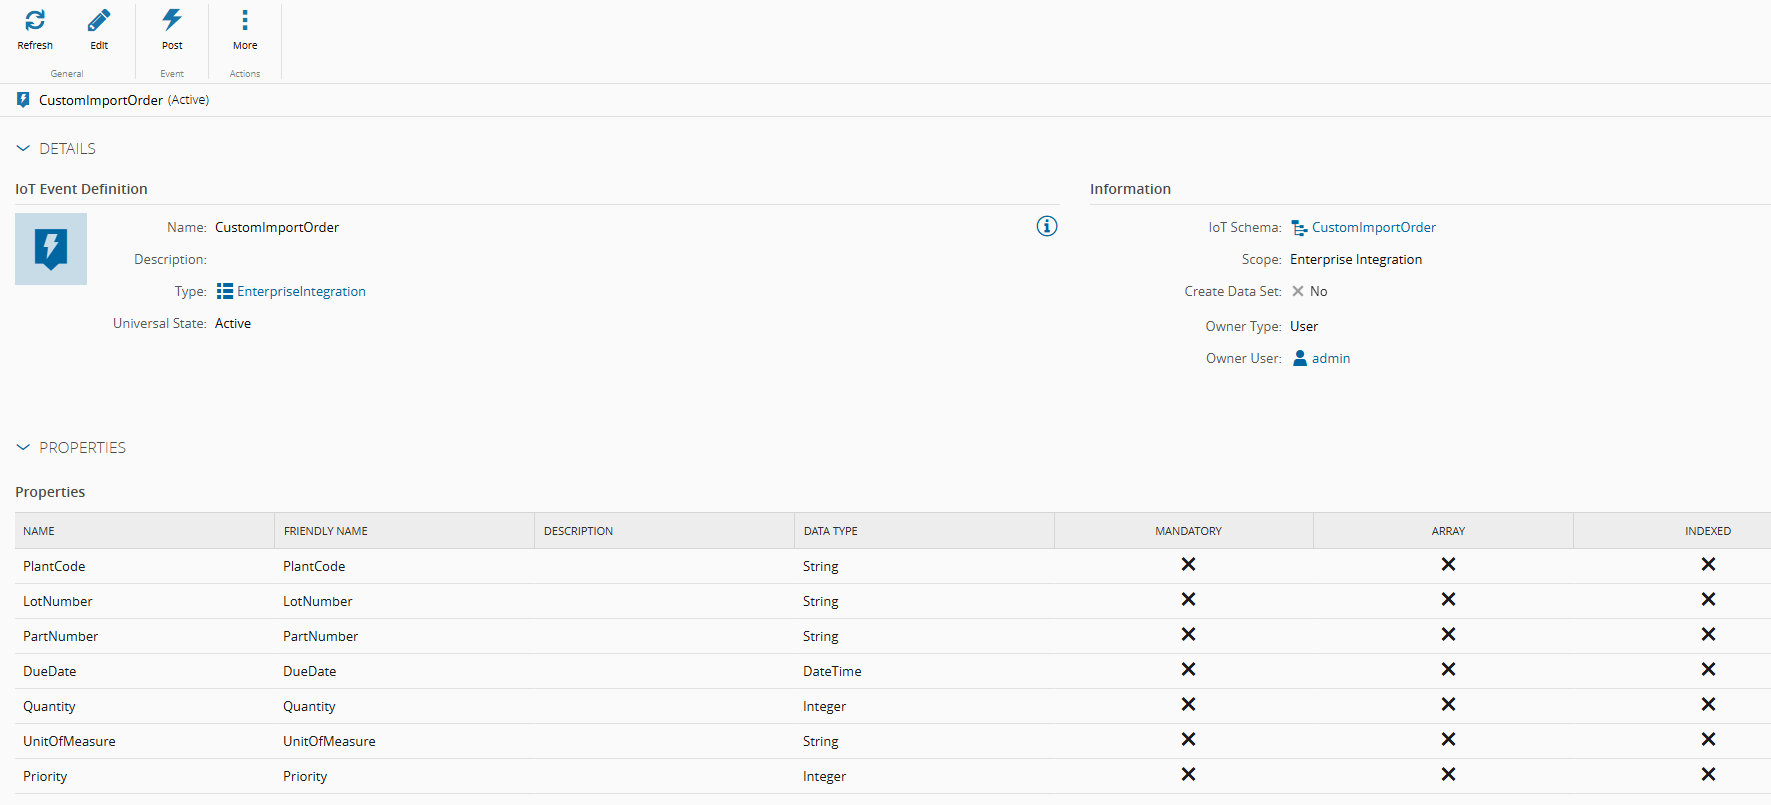
💡 At the event definition creation wizard, instead of entering each property individually, you have the option to Import a JSON file or template. The wizard will parse the content and generate the properties automatically. Nevertheless, ensure that the properties are created with the expected data type.
Now that the event is registered, an AutomationController must be created. Create a new one for scope Enterprise Integration and choose the IoTEventDefinition created above. In this controller, we will define the workflow that will be triggered when the integration entry is set to be processed.
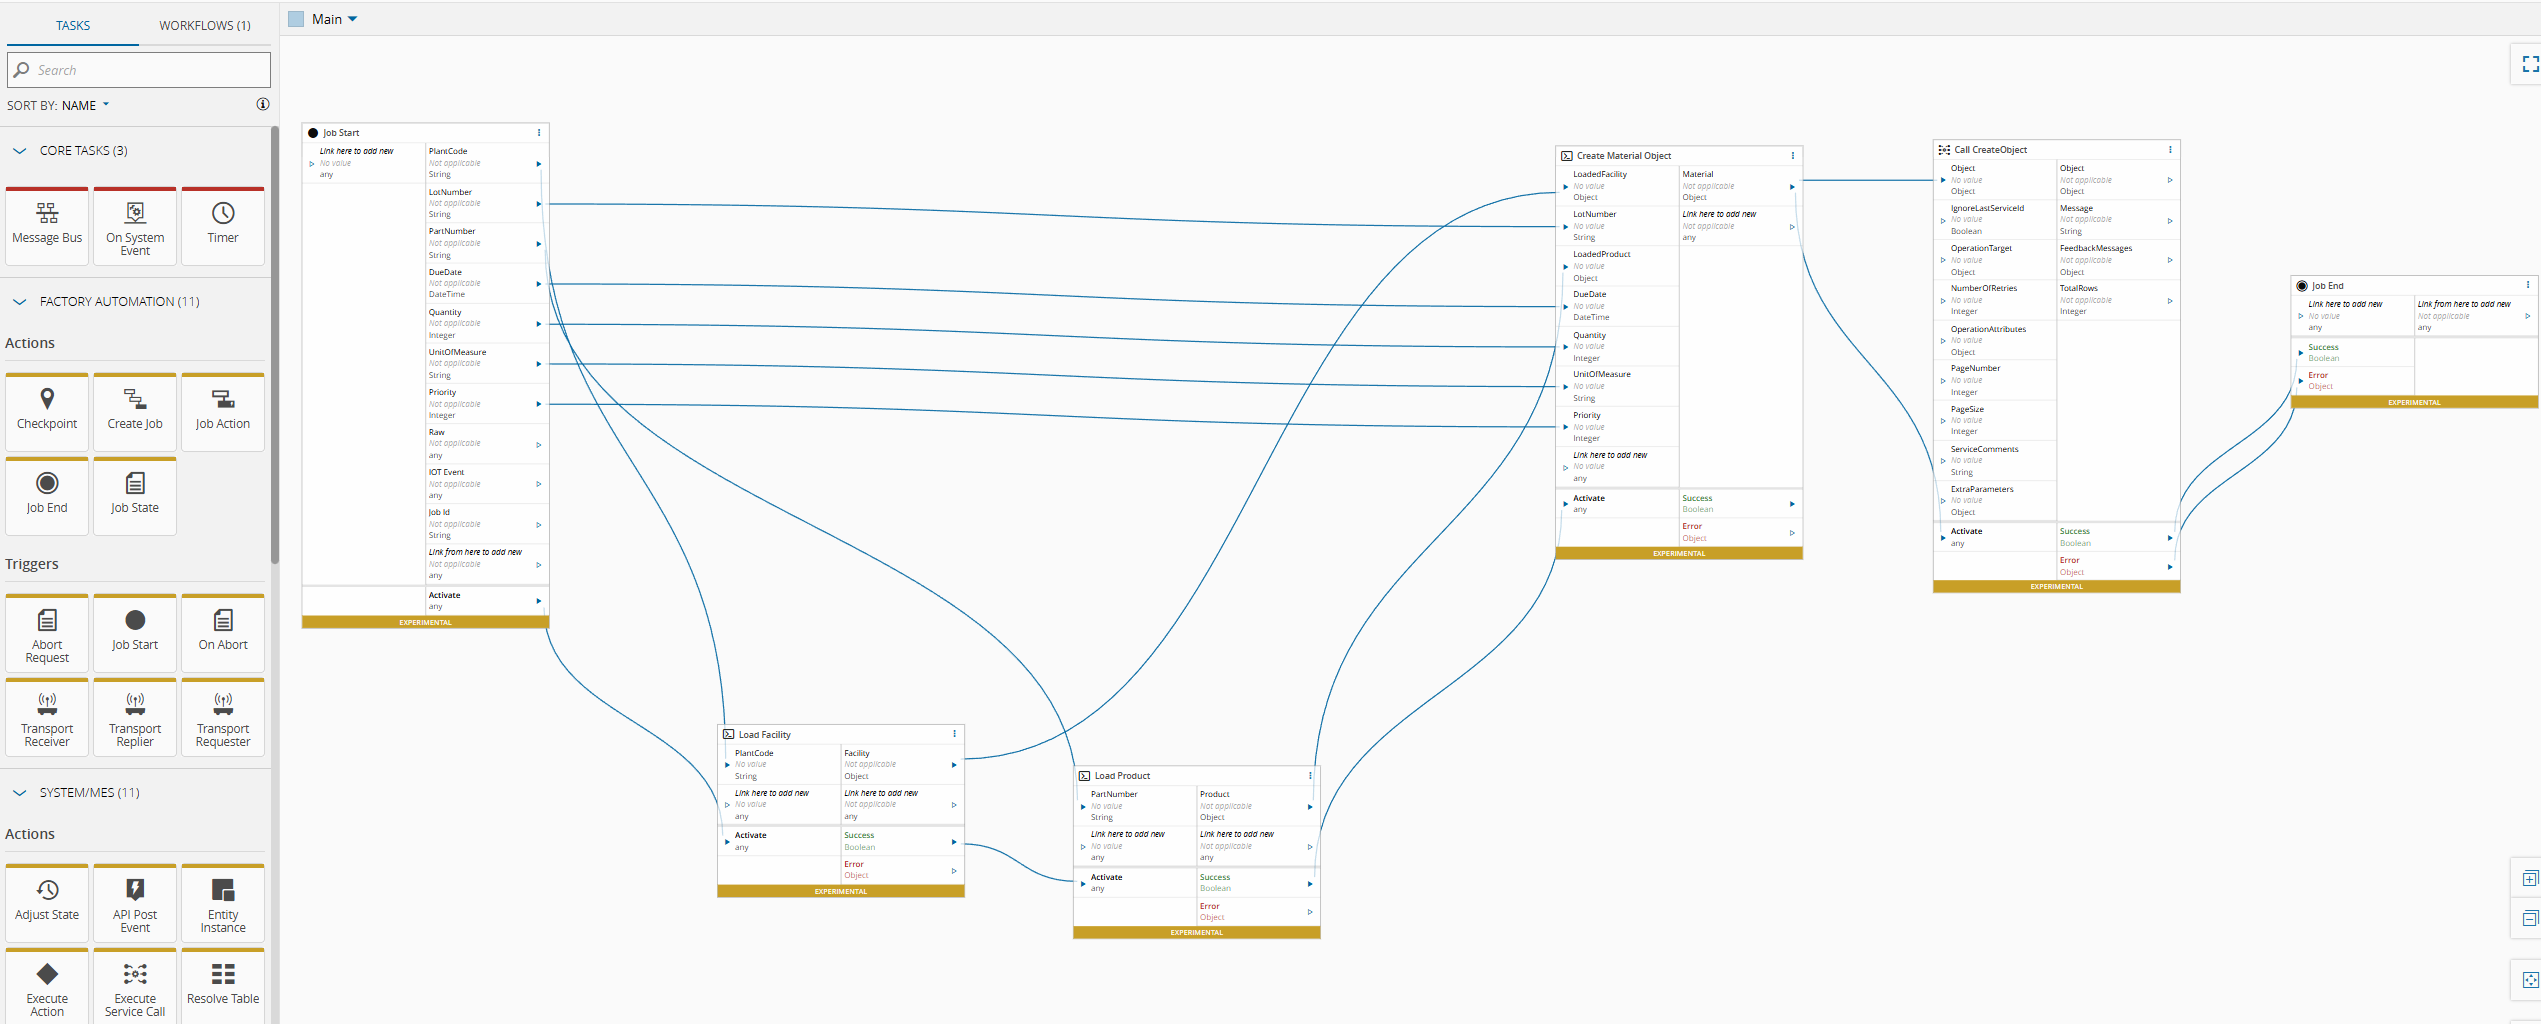
In the workflow above, we have setup the following tasks:
- Job Start
- Initial task that just outputs the list of properties defined in the
IoTEventDefinition.
- Initial task that just outputs the list of properties defined in the
- Load Facility
- The task receives as input the PlantCode from the event definition.
- As a code task, it is running a query to retrieve the Facility whose custom attribute matches the PlantCode, and returning it as the output.
- Load Product
- Similar to Load Facility, but just loads a Product whose name matches the input PartNumber.
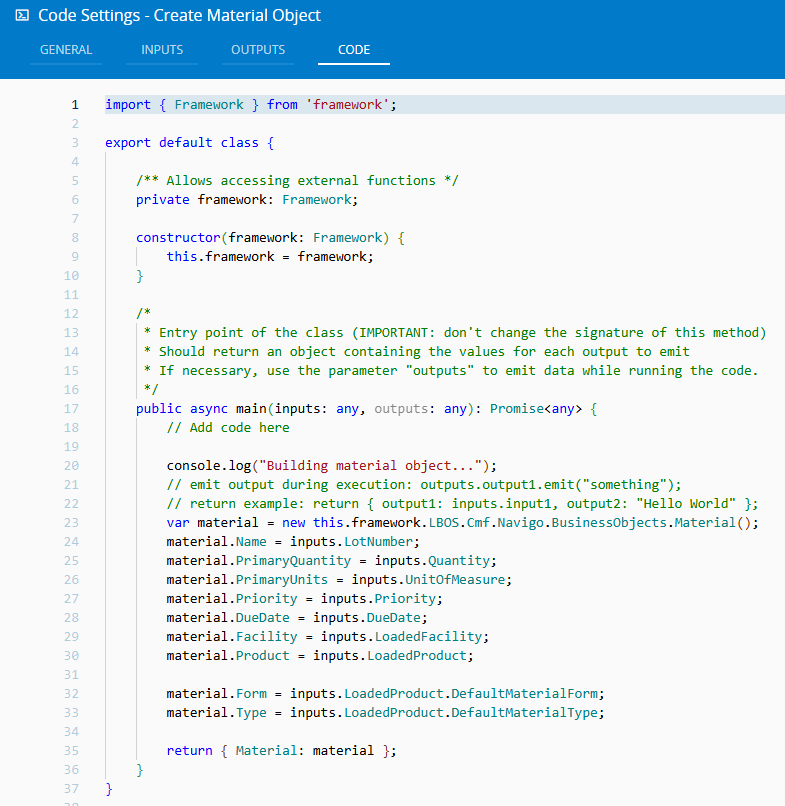
- Create Material Object
- With the original event properties and the result of the previous tasks, this task builds a
Materialobject and returns it as the output.
- With the original event properties and the result of the previous tasks, this task builds a
- Call CreateObject
- This task will call the
CreateObjectAPI, to create the inputMaterialobject.
- This task will call the
After the AutomationController is approved and set effective, the only thing missing in the configuration should be more familiar. In the IntegrationHandlerResolution smart table, the IoTEventDefinition created above should be defined in the respective column instead of a DEE Action.
Execution
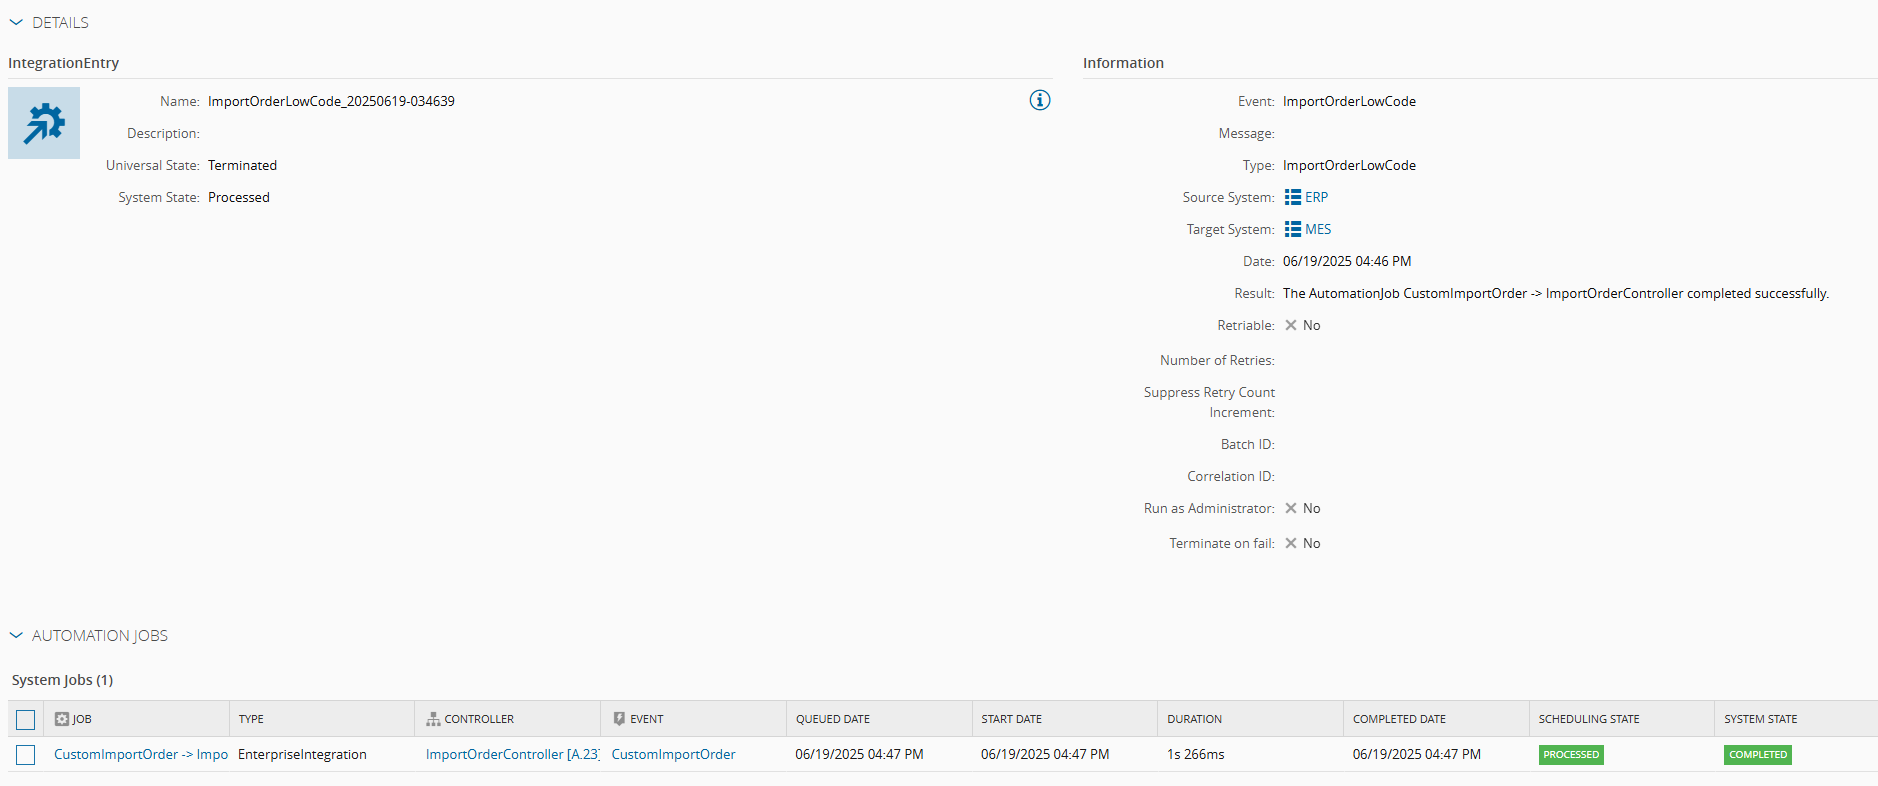
After the configuration is in place, we can test the execution by creating a new IntegrationEntry with the respective MessageType and the expected JSON payload. For integration entries processed using this mechanism, additional information can be reviewed, since an AutomationJob is created. Execution metadata such as the duration, creation time and completed date are available in the entry’s details page.
Technical Overview
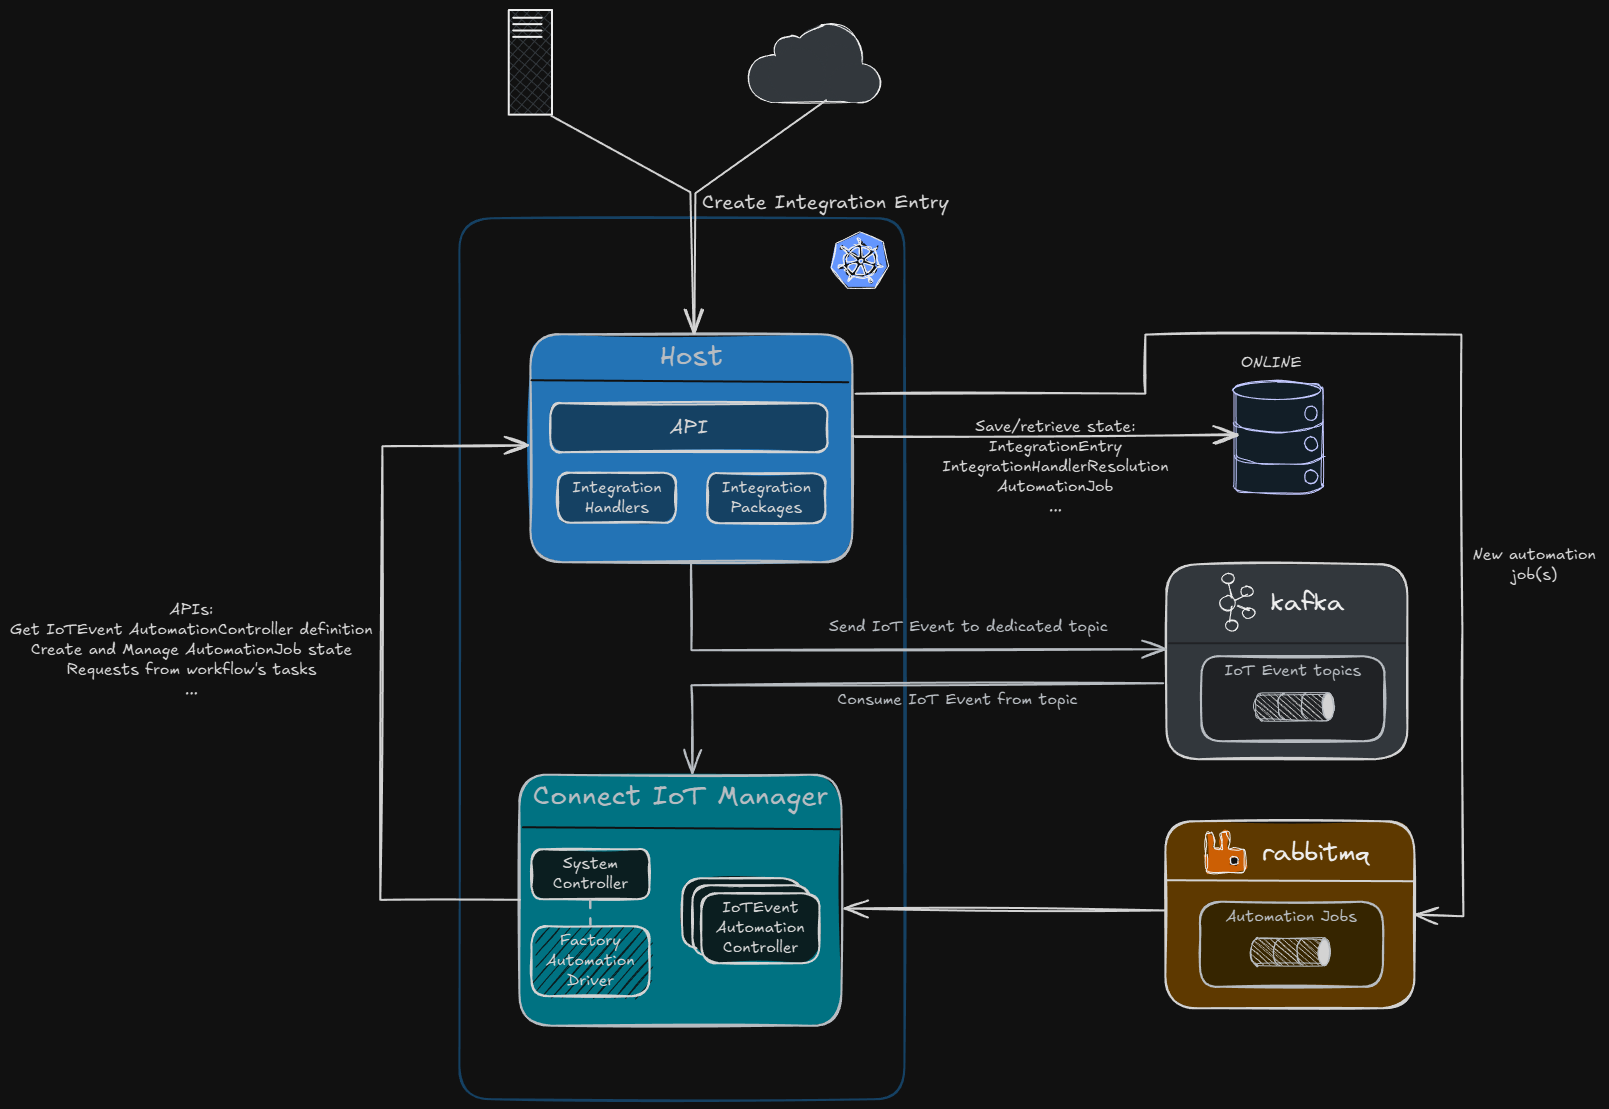
We’ve seen from a functional standpoint what needs to be configured to set up enterprise integration workflows using event definitions. But how does this technically work? The following diagram explains from a high-level perspective the relationship between the different components in this processing pipeline.
The initial part of the process is similar to what we have seen before; it’s not relevant if an integration entry message type is configured to be processed by the traditional implementation route (e.g., DEE Action) or by low code workflows (IoT Event Definition).
The IntegrationEntry is created either by external applications (inbound) or by CM MES itself (outbound). The previously described integration orchestrator will pull the respective integration entry to be processed and, if the configuration in the IntegrationHandlerResolution smart table determines that the handler type is GenericIntegrationHandler and the IoTEventDefinition column is not empty, then it will trigger the pipeline to process that message.
The integration handler will send a message to the Apache Kafka broker, containing not only the original message’s payload but additional metadata, including the EventTime, IPAddress and other event properties.
In the Kafka cluster, there will be one topic for each registered IoTEventDefinition. For example, during the demo described above, a new topic was created in the environment’s Kafka cluster with the format <EnvironmentName>_enterpriseintegration_customimportorder_raw, being CustomImportOrder the name of the IoTEventDefinition.
One could even monitor and read the messages written to the respective topic. For example, in a CM MES environment where Kafka is hosted as a pod inside our deployment stack, we can open a terminal inside the running pod and use the kafka-console-consumer CLI tool to read the incoming messages.

In this case the CM MES Host component is the producer, while the Connect IoT Manager will be the consumer of the messages.
⚠️ Connect IoT Manager
By default, a Connect IoT Manager deployment will be created and started when the application is installed. This manager will also contain a default Automation Controller Worker, that has been configured to handle these integration cases.
After the Connect IoT Manager consumes the message, it will use the Host’s API to create an AutomationJob. The Host will create the object in the database but also send another message to the RabbitMQ instance, which again will be consumed by the Connect IoT Manager’s internal controller. This will trigger the execution of the job, instantiating the respective AutomationController. Depending on the tasks in the workflow, the IoT process will call CM MES APIs in the Host component, finalizing the execution by completing the AutomationJob.
⚠️ Execute Service Call tasks
The workflow execution is not an atomic operation: in a scenario of multiple service call tasks, these are not executed under the same transaction. In the example above, only theCreateObjectservice call changes state in CM MES, but in the case of multiple state-changing service calls, one is required to handle potential inconsistencies when one service call succeeds but the following in the workflow does not. Consider those potential issues when designing your workflows.
Summary
In this post, we took a look at an alternative, relatively new way to integrate with external systems, focused on visual widgets/components that can be orchestrated via drag-and-drop operations to build a comprehensive integration workflow, with minimal additional coding. As previously stated, this is an alternative way that can be used together with the traditional development approach, since they are not mutually exclusive. For simple integration scenarios, low code integration can be a valid alternative and even provide some advantages, such as the speed of implementation.
To conclude this post, it is worth mentioning that there are already plans to provide, in advance, integration scenarios for common use cases, such as importing a production order from SAP.
For follow-up questions or other topics that you’d like to be in this blog regarding integrations, please feel free to reach me!
Author
Hi! My name is Ricardo Cunha. ✌️
I joined Critical Manufacturing back in 2013. I started my journey as a Software Engineer, progressed to Tech Lead, and currently serve as a Technical Architect in the Solutions Delivery area, providing technical guidance for CM MES deployments.
You can check me on LinkedIn
