Showcasing the Dynamic Tags Package to Speed Up and Templatize OPC-UA Implementations
Introduction
This controller aggregates customers requirements on OPCUA implementations and is evolving to satisfy new requirements for on common scenarios.
Main Features
- Perform DataCollections
- Execute machine state changes
- Service and DEE calls
- Recipe Management
Perform a DataCollection
Performing a DataCollection can be triggered by:
- A timer elapsed or a cron job expression
- A tag cycle counter
Machine State Change
A specified Tag value can be used to represent the actual machine state
Service and DEE Calls
- Call Service or DEE action on a Tag change event
Recipe Management
- Support Recipe Parameters and Recipe Body
- Uploading a Recipe from Equipment
- Downloading a Recipe to Equipment
In the following sections we will detail and provide usage scenarios for each use case.
How this Works
In this package, we use OPCUA Driver Extensions (https://help.criticalmanufacturing.com/userguide/business-data/automation-protocol/automation-protocol-protocols/driver_opcua/#driver-extensions) to avoid being restricted to a specific Equipment Driver Definition. The Controller behaviour is configured for each feature using these smart tables:
CustomIoTOPCUADataCollectionContext 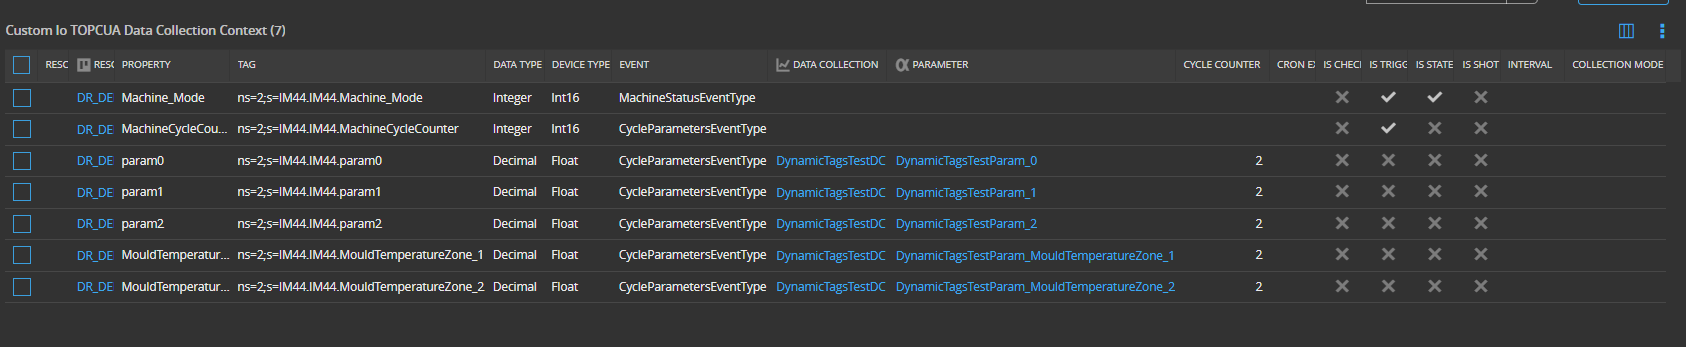
CustomIoTOPCUAExecutionContext 
CustomIoTOPCUARecipeContext 
COMMON Repository
COMMON is a repository where projects can implement features that can be shared and reused. This mitigates the need to implement the same code across different projects. The features are posted to COMMON and every project is free to import, use and contribute back to make it even more robust.
The repository has two main branches: development and development-10x. Each one containing the corresponding controller version for each MES version:
MES versions up to V9.x: https://tfs-projects.cmf.criticalmanufacturing.com/ImplementationProjects/COMMON/_git/Packages?path=%2FFeatures%2FIoT-DynamicTags&version=GBdevelopment&_a=contents MES versions equal or greather than V10x: https://tfs-projects.cmf.criticalmanufacturing.com/ImplementationProjects/COMMON/_git/Packages?path=%2FFeatures%2FIoT-DynamicTags&version=GBdevelopment-10x&_a=contents
Using this package on my project
To use this package on your project, add to your repositories.json:
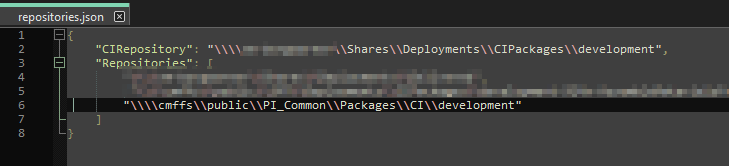 PS: For V10x, add “\\cmffs\public\PI_Common\Packages\CI\development-10x” instead
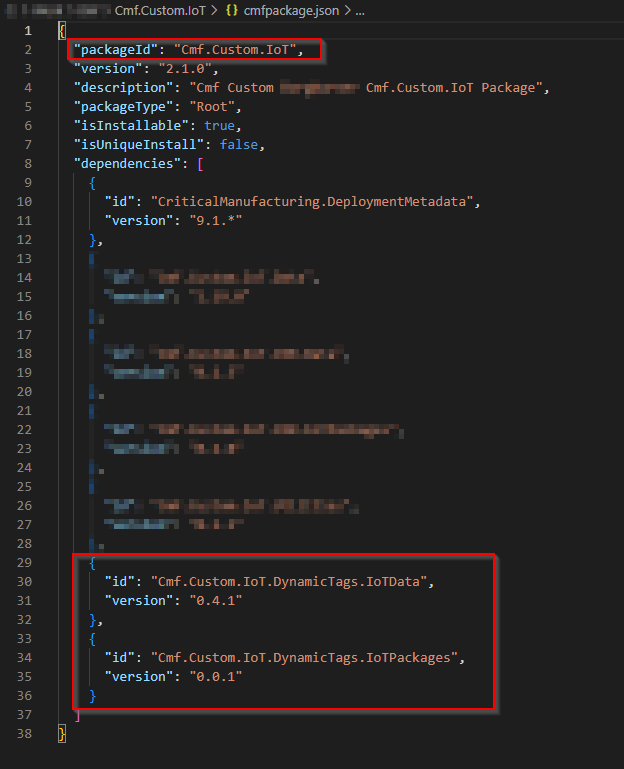
Also, add to your cmfpackage.json file:
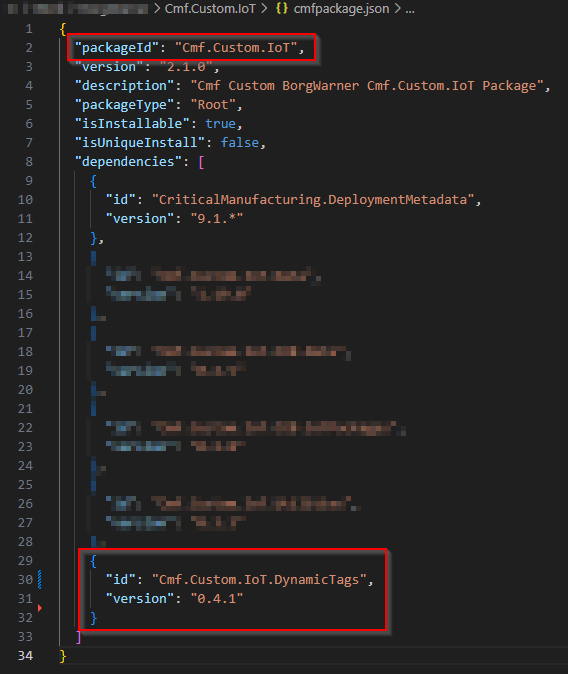
Important: If your project is using a different patch version than the one this package was prepared for (in either V9 or V10), please use the components unrooted:
Feature Configuration
Available package options are described on package README.md.
Configuration is orchestrated on a smart table <ST>IoTMetaDataDefinition by name/value pairs. Used entries are:
| Name | Description | Default/Example Values |
|---|---|---|
| OPCUA_Address | The OPC server address to be used | opc.tcp://serverhostname:serverport |
| OPCUA_User | The user to access to the OPC server | |
| OPCUA_Password | The password to access to the OPC server | |
| OPCUA_SecurityPolicy | The security policy to be used to access to the OPC server | |
| OPCUA_StateModel | The state model to be used | OPCUA |
| disableAutomation | To disable automation actions even when Communicating (Boolean) | false by default |
| DynamicTags_CreateNotificationDEE | DEE to be used to create Notification on disconnect | |
| DynamicTags_DisconnectedNotificationTemplate | Notification Template to be used on disconnect |
Creating a Controller Instance
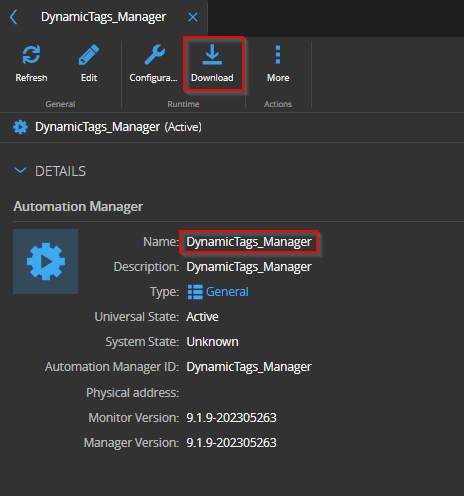
After the release process, the environment will have a new automation manager, DynamicTags_Manager, and a new controller, DynamicTags_Controller.
To use it, just create a controller instance by connecting this controller to a Resource.
Installing needed software for testing:
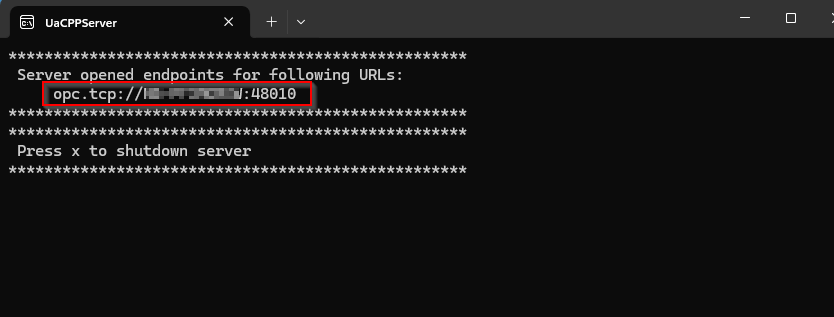
1 - Install the OPCUA Server (available on: OPC-UA Server). After installation, start the UaCPPServer app and note the server address:
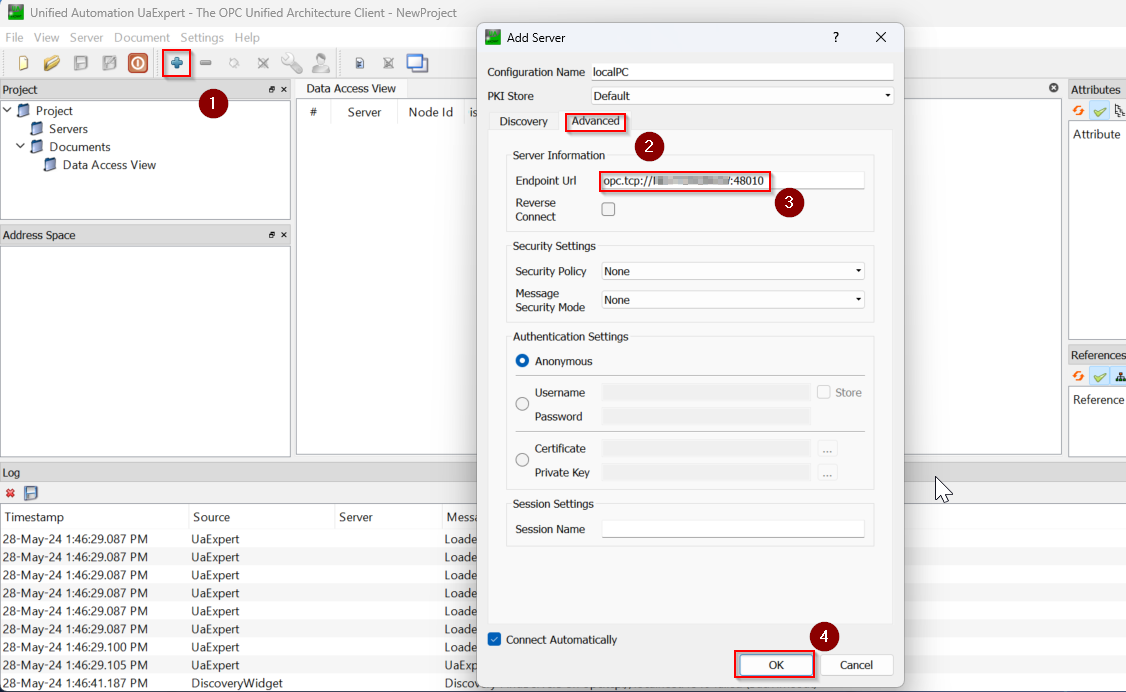
2 - Install the OPCUA Client (available on: OPC-UA Client). Start the OPCUA client and establish a connection to the server. Use the address supplied by the server app as the Endpoint Url:
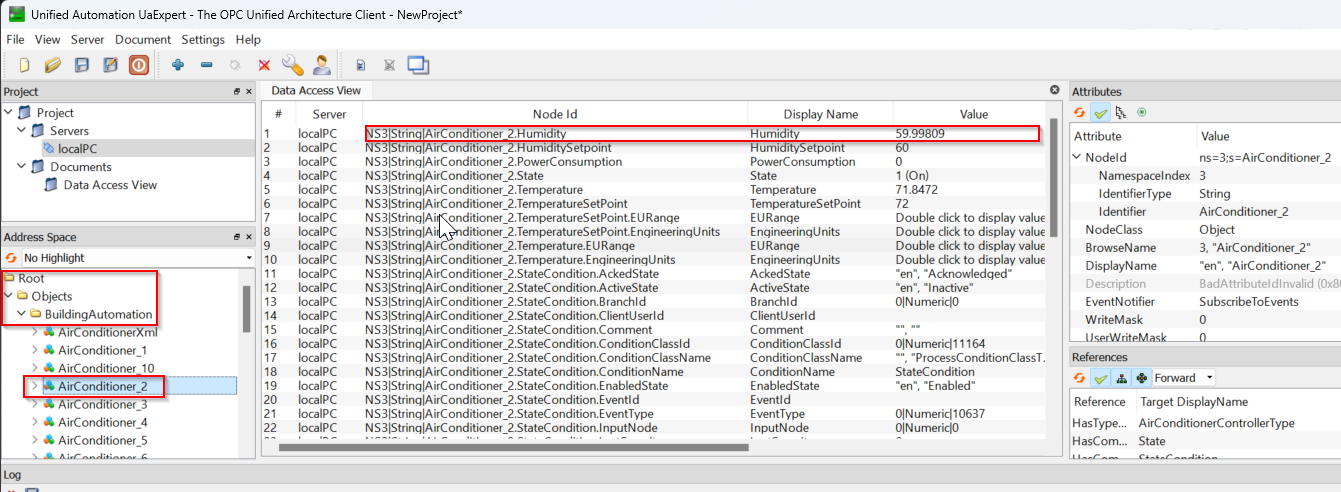
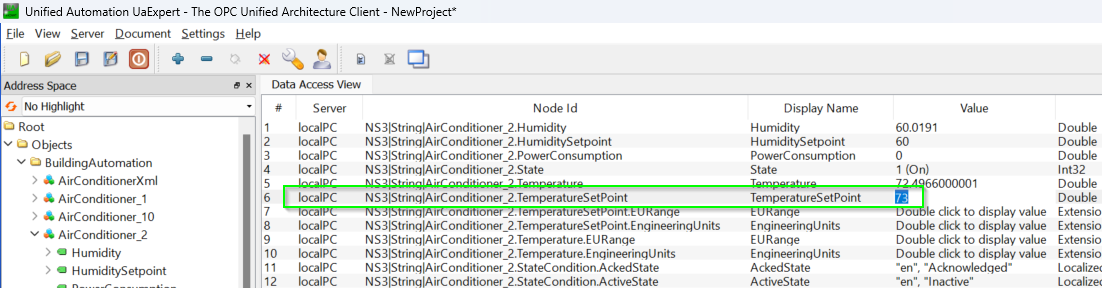
3 - Open the Objects folder and drag the AirConditioner_2 to the DataAccessView windows. Check the first node value is constantly changing (there is a simulation running in background). Later we will use the DynamicTags Controller to collect this data.
Execution time!
Use the OPCUA server address to configure the IoTMetadataDefinitions (for now, we just need these entries):

Download the manager from MES GUI:
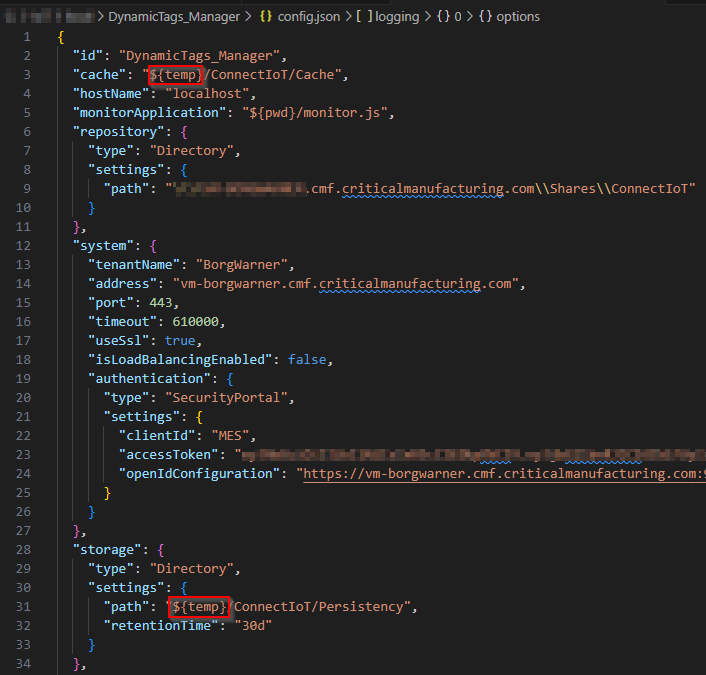
Unzip it to a folder. Configure the correct paths in your config.json file to match your local needs (Cache, Persistency, IoT Repository and Logging):
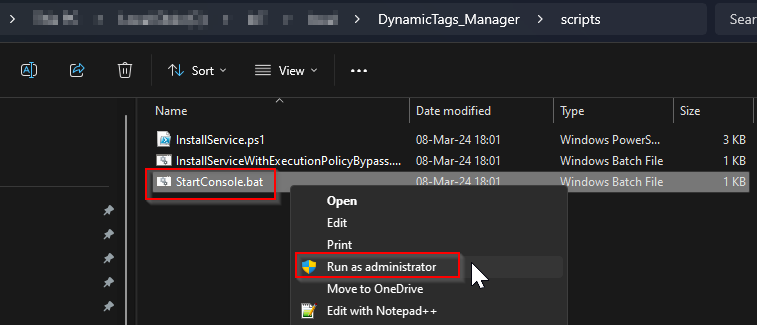
Now run it:
If everything is ok, the controller should change state to “Communicating”:

DataCollection Perform Example
Fixed time intervals:
Let’s setup the Controller to collect the Humidity data available at Tag ns=3;s=AirConditioner_2.Humidity referenced early.
Set CustomIoTOPCUADataCollectionContext as indicated:
Tag: ns=3;s=AirConditioner_2.Humidity
DataType: Decimal
DeviceType: Double
Event: CycleParametersEventType
DataCollection: The DataCollection to be performed (DynamicTagsTestDC for this example)
Parameter: The DataCollection Parameter to be performed ( DynamicTagsTestParam_1 for this example)
CronExpression: The Cron Expression time to collect the data periodically at fixed times, dates or intervals. For this example let’s use */10 * * * * * to allow for a 10 seconds period
CollectionMode: Perform To Resource

Restart the Controller, it should connect to the server and start collecting data. If we analyze the logs, we can find the moment when the data is about to be saved:
 PS: Note the 10 second interval between collection timestamps
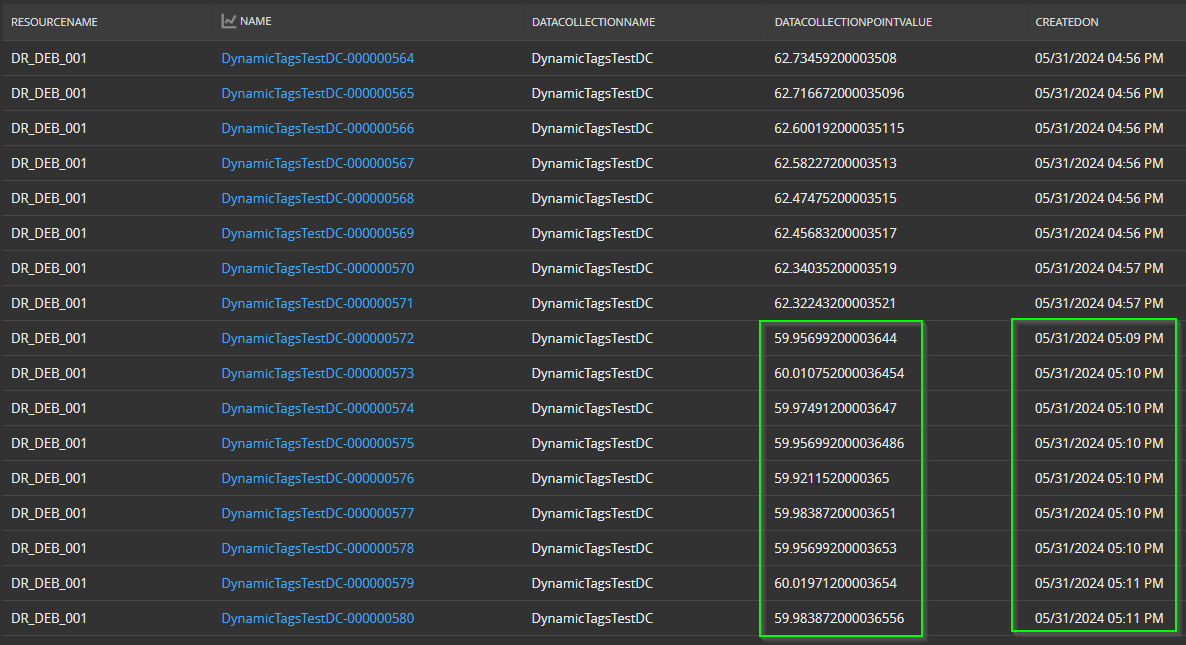
Also, if we query MES for that DataCollection, we should get the collected points:
Triggered by value changed:
If we are interested on collecting the data only when it’s changing, just change this entries at CustomIoTOPCUADataCollectionContext:
CronExpression: (empty)
CycleCounter: 1
IsTrigger: True
Restart the controller, and wait the Communication status going to Communicating. After some seconds, we should have a lot of collection points: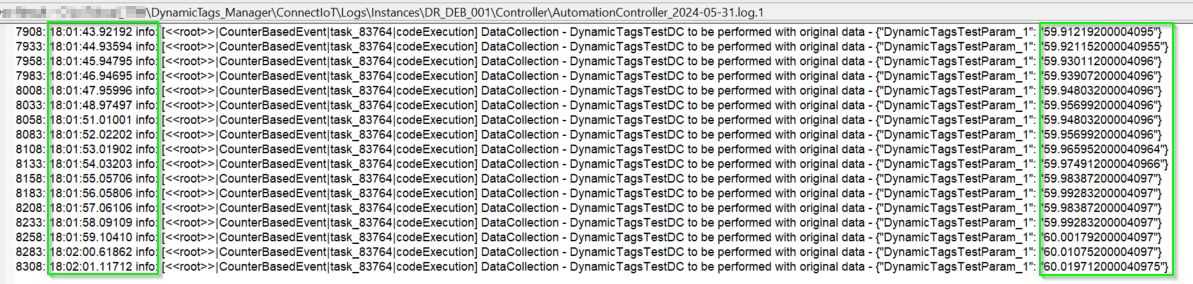 Note now the timestamps. Each time the Tag ns=3;s=AirConditioner_2.Humidity change it’s value, a datacollection is performed.
Machine State Change Example
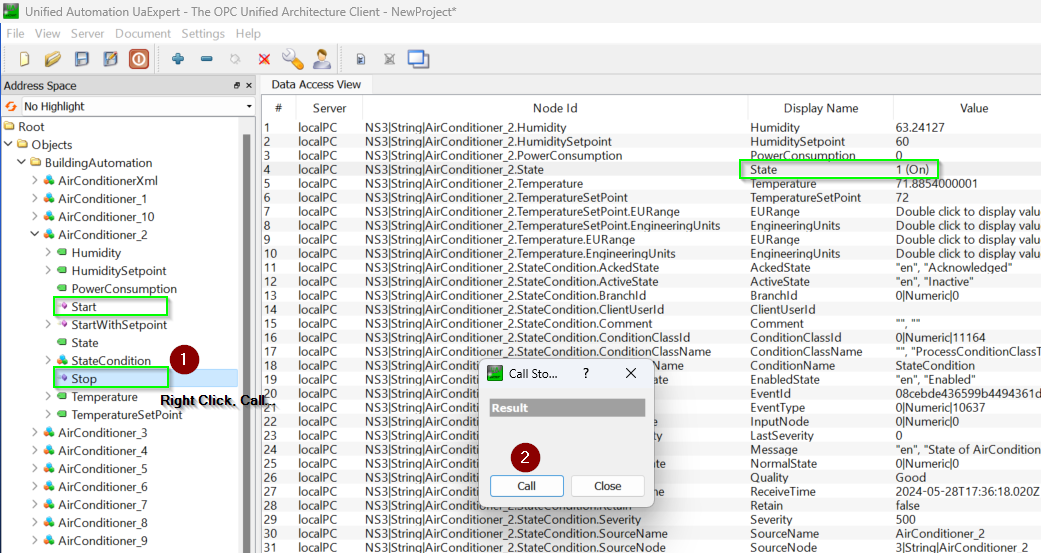
Let’s setup now the Controller to collect the equipment State, represented by the Tag ns=3;s=AirConditioner_3.State (check the OPCUA client DataAccessView position #4)
Set CustomIoTOPCUADataCollectionContext as indicated:
Tag: ns=3;s=AirConditioner_2.State
DataType: Integer
DeviceType: Int32
Event: CycleParametersEventType
DataCollection: (empty)
Parameter: (empty)
IsState, IsTrigger: True
IsShot: False
Interval: (empty)
CollectionMode: Perform To Resource

In order to translate the Tag values to SEMI E10 states, we need also to setup the table IoTStateModelContext, for that resource. Since the Tag only takes ‘0’ (Off) and ‘1’ (On) as values, we only need to map these two values:

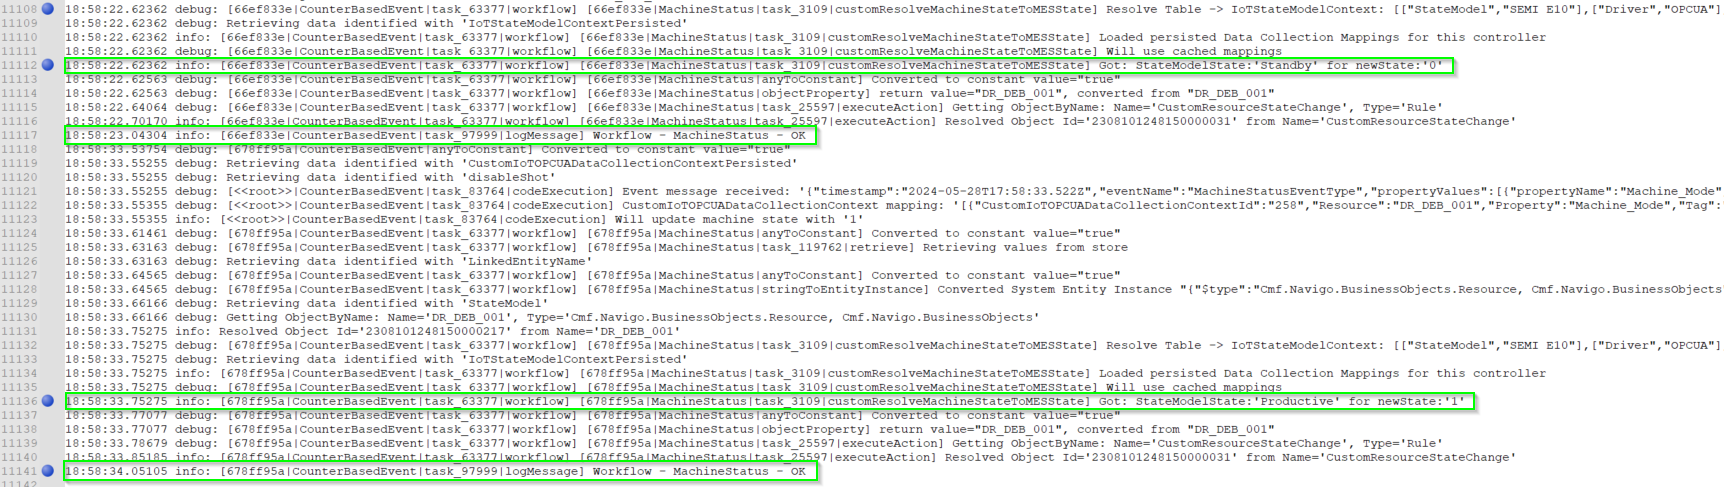
Now, restart the Controller so it can assume the new configurations. In order to change the Tag value, since this server is running a simulation, we cannot change directly the value. Instead, we should send a Start or a Stop command. Let’s send a Stop command:
You should see now the Tag ns=3;s=AirConditioner_2.State now changed to ‘0 (Off)’. Now, start again the simulation (just repeat the process above, this time for the Start command). The tag should change now back to ‘1 (On)’ value. Looking at the controller logs, we can find both state changes:
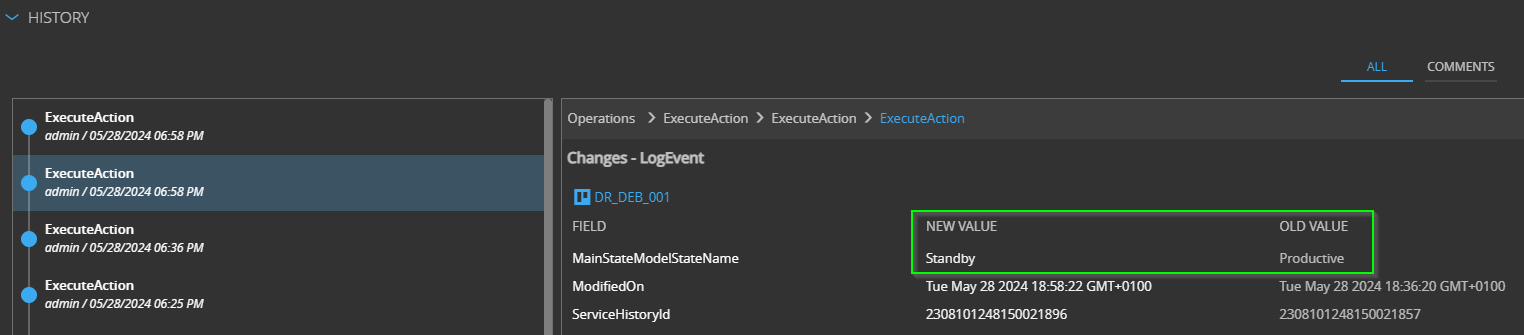
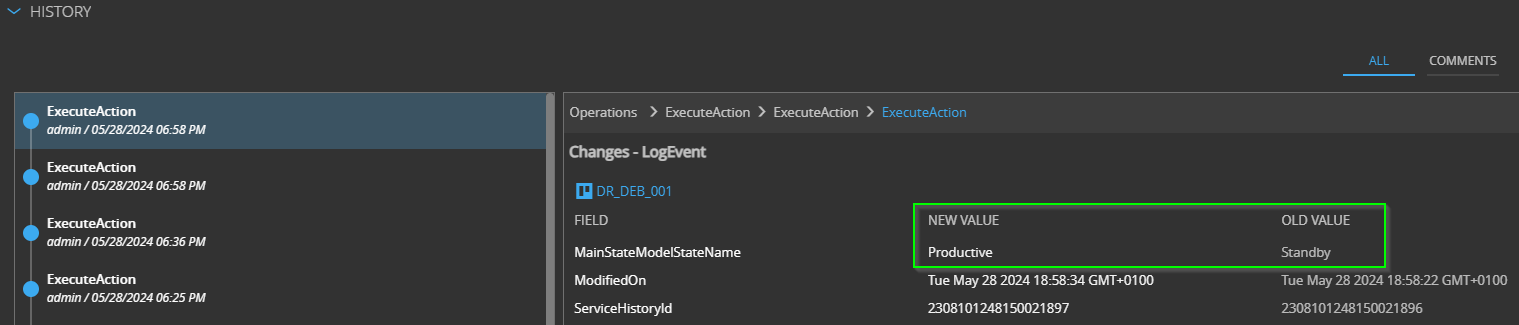
You can also check the Resource history at MES and find the state changes according:
Service and DEE Calls Example
The services and DEE calls are defined at smart table CustomIoTOPCUAExecutionContext. Let’s assume we want to call a DEE anytime the value of the Tag ns=3;s=AirConditioner_2.TemperatureSetPoint is changed. Set CustomIoTOPCUAExecutionContext as indicated:
Tag: ns=3;s=AirConditioner_2.TemperatureSetPoint
DataType: Decimal
DeviceType: Double
Event: Execution
ExecDee: True
ExecService: False
ExecDefinition: Name of the DEE to be executed (CustomIoTSetPointChanged for this example)
TriggerOnChange: True

Now, restart the Controller so it can assume the new configurations. Change the Tag value (double-click at the value):
We should find at Controller logs the entries related to this DEE call:

For a service call example, follow the same procedure. Just change the ExecDee and ExecService according and use the service namespace and url at ExecDefinition, separated by a pipe ( “|” ):
ExecDee: False
ExecService: True
ExecDefinition: Cmf.Foundation.BusinessOrchestration.ApplicationMonitoringManagement.InputObjects.SetMaintenanceModeInput, Cmf.Foundation.BusinessOrchestration|api/ApplicationMonitoring/SetPointChangedService
Recipe Management Examples
Get Recipe Body
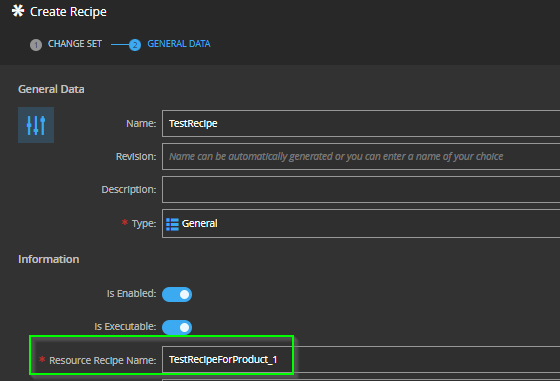
Let’as assume our equipment has two main setpoints, Temperature and Humidity, for a specified equipment recipe (in this example, TestRecipeForProduct_1):

We should set the smart table CustomIoTOPCUARecipeContext according:

Now, create a new Recipe TestRecipe at MES (or create a new version if already exist), be sure to set the Resource Recipe Name the same you already set at CustomIoTOPCUARecipeContext table:
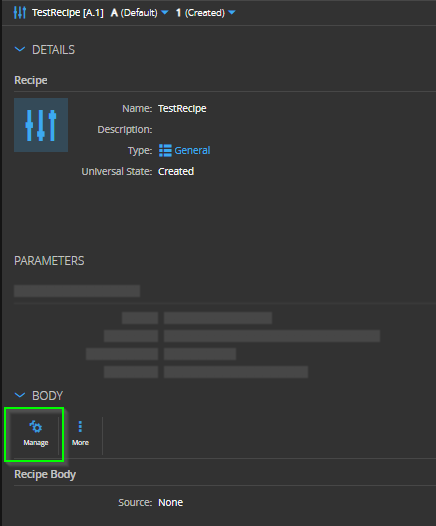
Go to Recipe Details > Body > Manage:
Select Downloaded From Equipment as the Source, set the Resource and click GetRecipes. The Controller will reply back with all Recipes existing at CustomIoTOPCUARecipeContext for this Resource:
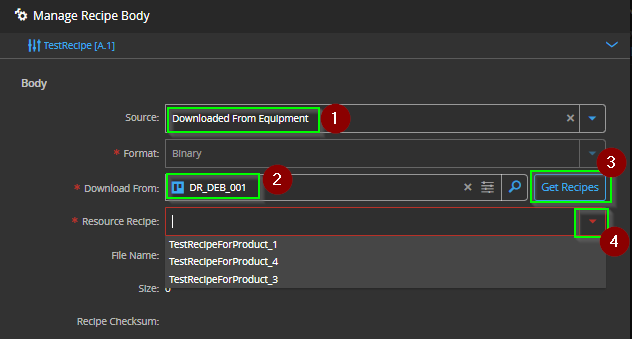
Pick the TestRecipeForProduct_1 and then click Download Body. The Controller will get the setpoints (Tags) from the equipment and send them as the body to MES: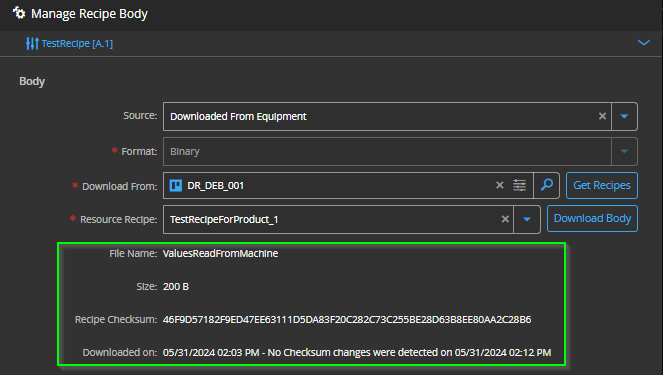
We can verify the body content. Just download the body and check it’s contents against the equipment setpoints indicated previously (Humidity: 60, Temperature: 72):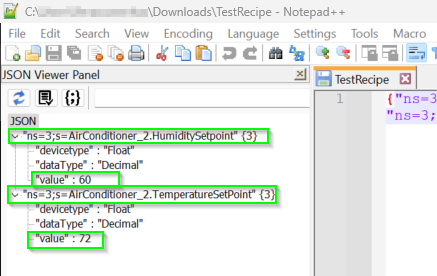
PS: In the DynamicTags’s implementation, the Recipe Body is used to save Parameters data (tag names, definitions and values). This is not saved in the Recipe Parameters as expected.
Set Recipe
Now we have the setpoints already store at the Recipe, we can set these setpoints back to the equipment when needed.
First, let’s change our current setpoints to any other different values: Humidity: 59, Temperature: 71. (At OPCUA client, just double-click the value and enters a new value):

Go to our Resource main page, and click Set. Select the Recipe TestRecipe and click Set:
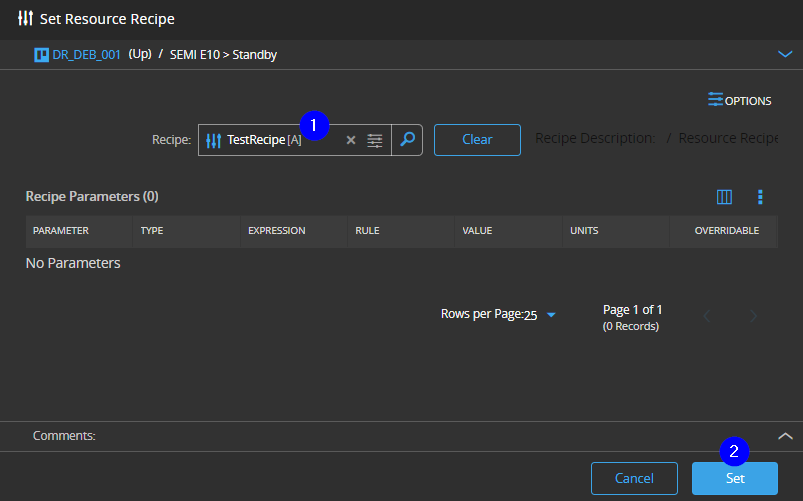
The Controller will receive a request from MES with the Recipe body data and will send the new setpoints to the equipment:

Now the equipment received the new setpoints corresponding to this Recipe:

Author
Hello, my name is Luis Filipe Mascarenhas I am an IoT Engineer for the SMT area. You can visit me at LinkedIn
Skills: Connect IoT