This will be a small overview of the typical configurations that can be seen for running Connect IoT.
Topics
- Overview
- System Requirements
- Using the MES GUI
- Using the Setup
- Running as a Console
- Productive Deployment
- Running as a Windows Service
- Using the DevOps Center
Overview
Connect IoT supports multiple architectures to best adapt to the integration scenario. The architecture of the application is centered on having a main or parent process, the Automation Manager and that process is responsible for spawning all the subprocesses of ConnectIoT.
Each process that constitutes Connect IoT is a nodejs process. The smallest amount of nodejs processes that Connect IoT requires to be fully functional is four. It requires the parent process Automation Manager, the Automation Monitor, then an Automation Controller and an Automation Driver.
Connect IoT also, requires a registry with the packages required to run. These packages may be in a directory or in an NPM registry, also they can be in a directory that the MES has access and then the Automation Manager, may request through REST requests the packages from the MES.
The Automation Manager also generates logging and is able to write to files process data, through a mechanism called persistency.
It is important to have a global idea of the architecture, so as to understand what may required in terms of deployment.
System Requirements
The system requirements vary according to what drivers your implementation uses. Some of them have particularities that are described in the help Connect IoT Requirements.
Regarding hardware it is somewhat hard to know before hand, as it depends on what you are using the manager for and the level of traffic and processing you are expecting. The hardware needs also vary by driver, some are more resource intensive than others. It is accepted that typically the bottleneck is RAM allocation Hardware Requirements.
Using the MES GUI
The first interaction most Connect IoT users has with the application is through the Automation Manager GUI, in that GUI it’s possible to download a zip file with all that is needed to run the Automation Manager. The download will also generate a new authentication token for the user selected as integration user for the download.

It is important to note that the GUI allows you to customize for each particular manager the configuration that you want that manager to export when downloading. Also that configuration can be changed for all Automation Managers in the config /Cmf/System/Configuration/ConnectIoT/ConfigurationTemplate/, or in the specific Automation Manager. This may be very useful, to have pre configured all the configurations for what is relevant in your case.
The zip file that is generated contains the following:
- scripts (folder)
- service (folder)
- src (folder)
- config.json
- npm-shrinkwrap.json
- package.json
- README.md
Some of these are more obvious than others.
Looking at the files:
Regarding versioning and metadata, that is assured by the npm-shrinkwrap.json and package.json 📄. The README.md 📄 contains the documentation on the automation manager entity The config.json 📄, controls all the key configuration for the Automation Manager and is a key part of the deployment process. All the fields of the config.json are described in the documentation under Help IoT Runtime Components Configuration
Looking at the folders:
The src 📁 folder is where the everything needed for the Automation Manager to run sits. In essence it is the source code of the application. The scripts and service folder are utilities that are included in the zip in order to be of easy use. The service 📁 has everything needed for the Automation Manager be installed as a Windows Service. The scripts 📁 has StartConsole.bat which enables to run the Automation Manager as a console application, it also has the InstallService.ps1 this script allows you to install as a windows service.
Using the Setup
The Critical Manufacturing Setup allows the deployment of an Automation Manager or several through a GUI. This method is useful if you want to deploy several managers, making the manual download through the GUI impractical and if you prefer to have a simple GUI abstraction.
In the Help Connect IoT Installation all the setups and configurations are explained. It works by selecting to deploy the Cmf.ConnectIoT.Packages and then it allows for filling in the GUI all relevant fields for the config.json of the manager. It also supports the possibility of installing as a windows service.

Running as a Console
This method is very useful, when developing or when troubleshooting an installation. It consists on running the process as a console, by using the StartConsole.bat script. When you run as a console, all the logs are aggregated as console output, so it may be easier to spot errors that are occurring.
Productive Deployment
There are several different ways to have a productive deployment of the Automation Manager, but before starting with the differences, let’s start with what is the same.
In a ❗High Availability❗ scenario, if a manager goes down, another must start to take it’s place. It’s important that whenever a new process starts, it doesn’t start from scratch and that it inherits the context that the previous manager was working with. This is very impactful when thinking about implementations that are very reliant on a persistent layer for tracking or data collection. If manager 1 is tracking a material A and for some reason manager 1 goes down, it’s important that the new manager 2 has a notion of material A. That is why typically, we suggest that the Storage/Persistency layer be stored in a shared folder accessible to all manager nodes, of course this depends on if the implementation uses the persistency layer for any logic.
It is also important to configure the logging appropriately, this is critical for very verbose drivers and implementations. You can configure retention times, rollovers, verbosity, etc Help Logging Configuration. If it’s important to keep the logs for a long time and a relevant amount, consider to also offload the logs to a shared folder, for risk mitigation.
Certificates: It is required that a certificate is defined for the Automation Manager. The certificate must be placed (or path to the certificate) in an environment variable NODE_EXTRA_CA_CERTS Certificate Troubleshooting. For development purposes the flag NODE_TLS_REJECT_UNAUTHORIZED can be set to 0 to use the certificate exactly as received. For more information and as a curiosity Extra CA Certificates Nodejs & Nodejs original issue
Running as a Windows Service
This was traditionally the main approach of a production environment and is still very much a possibility today. Some drivers, like OIB and OPC-DA are windows based, one because it is built on NetFramework and the other because it uses the DCOM, which are windows exclusive. As explained before, both the download action in the MES GUI and the Setup provide easy ways to install the Automation Manager as a Windows Service Library used for Creating nodejs windows services. It is important to highlight that the user used to run the windows service is also very important, as the permissions, or lack thereof may cause side effects. Keep in mind also, that if the password has expiration this will impact the automation manager, that is running that user.
High Availability Running as a Windows Service
Achieving High Availability using windows services is possible using a microsoft technology the Windows Server Failover Cluster Help Windows Server Failover Clustering. This allows for creating a cluster of different machines, where each machine will has installed the windows service we want to monitor. The Failover Cluster guarantees from the nodes, one and only one is always running. If one of the nodes goes down, meaning a windows service is shutdown, it will start in the other node a new windows service. The key and important part here is that node 1 and node 2 and node N all share the same accesses, configurations and so on, this enables it to be as smooth as possible when the failover occurs.
Using the DevOps Center
Critical Manufacturing following the industry trend and simplifying the deployment process, created a portal to be able to remotely perform the deployments, this is the DevOps Center Help DevOps Center. It also supports different orchestrators for deployment namely docker swarm and kubernetes and also different deployment targets Help Deployment Targets.
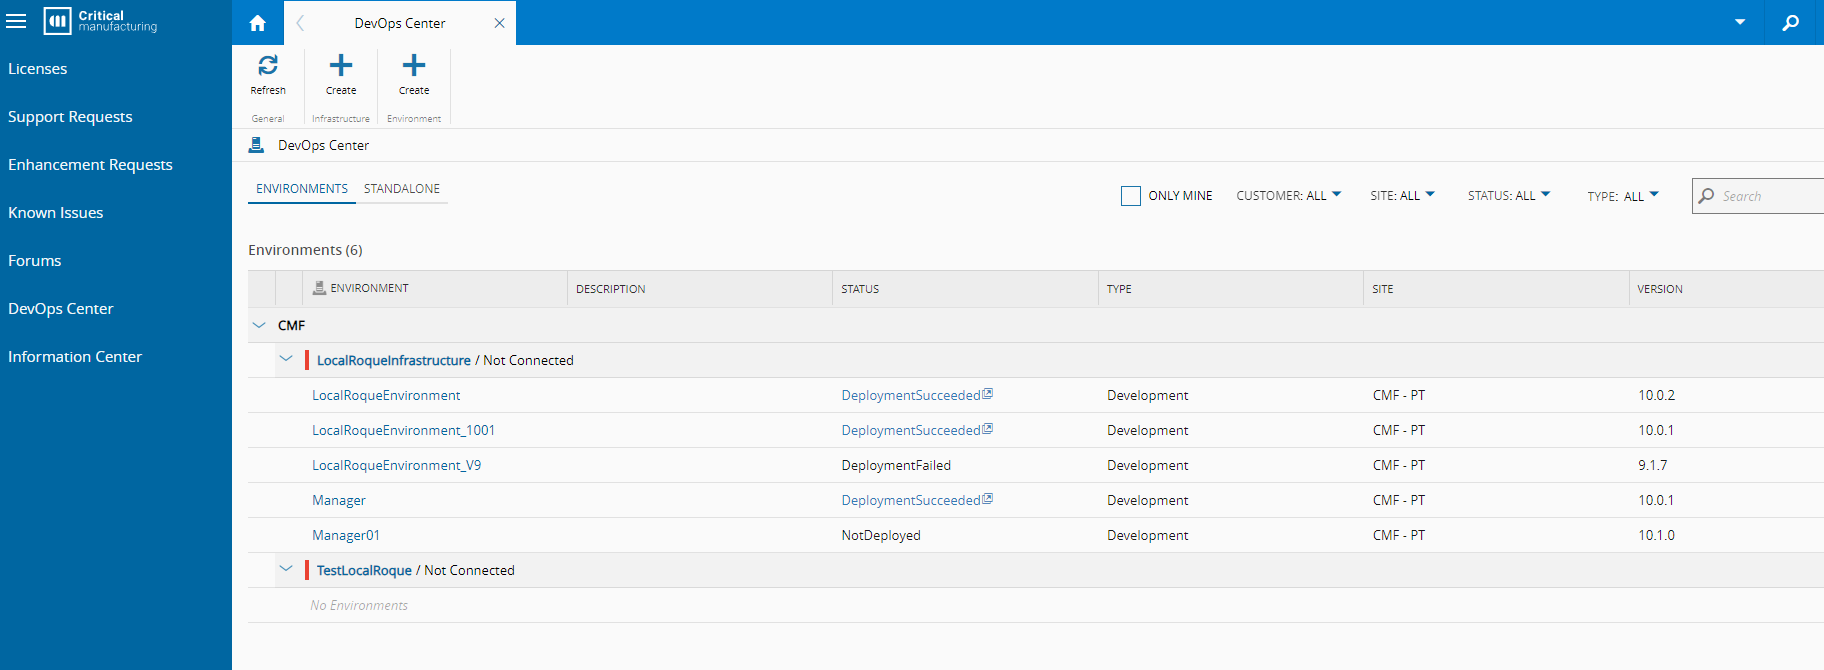
Using the Agent
Assuming you have an agent running in your machine, that agent will have the possibility to deploy automation managers. Doing that is a matter of, in your Infrastructure, deploying new Environments, MES Example, for each automation manager.
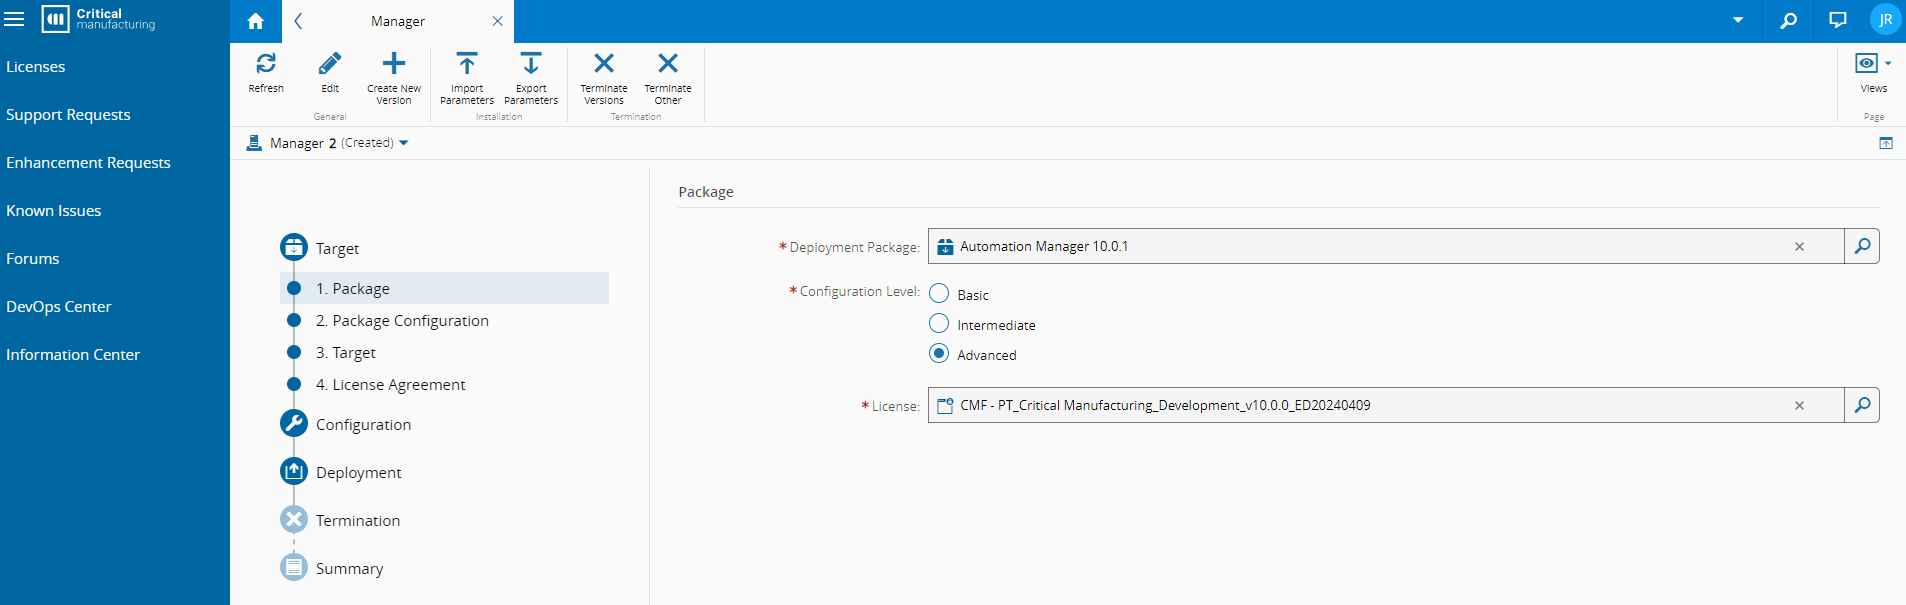
In order to deploy an Automation Manager select the Deployment Package, Automation Manager 10.1.0, or whichever version you need. Then select the target for the deployment. In the General Data, specify the Manager Id that you are deploying and the manager configuration related to system Help System Configuration. Regarding service resources, the automation manager will just run one instance of itself so just one replica. Volumes, will be where you specify where you will place the storage/persistency and the logs, also where the Connect IoT packages are accessible.
For certain drivers it is also important to create volumes, this is the case for example for all drivers that require file monitoring and processing. The DevOps Center allows you to set those mounts through the GUI as well. Currently, the only way to set open particular ports or ranges is by editing configuration yaml in the manager deployment.
Using the Agent, the agent will automatically deploy the stack.
Standalone Installation
The Standalone Installation works in the same way as using the agent, but it will generate a zip file that can be manually executed. In other words it is the previous method but with a manual deployment.
The zip file that is generated depends on the Target selected, but will consist on scripts to deploy and remove the stack and then the needed configuration yaml files.
Enabling Inbound Traffic: When using a driver that requires an external system to connect to it, instead of it connecting to an external system, a port will need to be opened for this access. Currently, the DevOps Center does not support setting it through the GUI. In order to do this, it will require a manual change in the configuration yaml, or in the system that is managing your stack, i.e portainer to open the port.
Author
Hello 👏 , my name is João Roque ✌️
I’ve been working for some years at Critical Manufacturing. I split my time working in the IoT Team and working with the project’s teams. You can visit me at https://j-roque.com/ or check me at LinkedIn
Skills: Connect IoT / DevOps