We are going to do a walkthrough of how the Connect IoT Database driver works. This is focused on snippet use cases and not on an exhaustive property by property use case.
Topics
- Should you use it?
- Pre-requisites and setting up an environment
- Connecting to the Database
- Executing Queries
- Database Polling
Should you use it?
No… ok blog post ended…. .
I am hearing you now in my mind, “but it’s really the only way”, “we really have to use it”. Ok ok, settle down. I will try to make a case not to use this approach.
Separation of Concerns - Databases are focused in persisting information in a structured way (for relational database). They are not concerned with guard clauses or with interfaces.
Change - Databases change over time, they can have schema changes, and because you don’t have an interface that is contracting between you and the database, things may change that impact you, without you knowing. Also, partition changes, fail-overs, load balancing, etc are a host of concerns that you are forced to have when interacting with a database, so there are a lot of points of failure.
Catastrophic Failure - A database may not be the brain of a system, but it is it’s memory. If you are directly interacting the database the margin for catastrophic failure is much higher. When you have an API in front of the database, the api can guard against bad requests and by being a controlled point of entry to the database can optimize for caching and for indexing, so when you bypass all that, a bad write may crash or throttle the database.
Security - A database should be a highly secure and the most protected component of your application. It may have sensitive data and is the greatest point of failure of an application. Having a third party application as Connect IoT doing requests is an easy security exploit. Imagine the following scenario: Upon configuring Connect IoT, by mistake the user given has admin privileges in the database, so someone decides to execute a query for droping tables, you can see how that can be an issue. Ok, this is a pretty dramatic example, but also bear in mind that the database was not made to enforce great role based levels of security, so it’s common to end up with much more permissions than you need, and if you have permission you gain responsibility for any future problem down the line.
So the database driver is one of those Uncle Ben’s kind of things: “With great power comes great responsibility”. Disclaimer aside, let’s get rolling.
Pre-requisites and setting up an environment
Currently, Connect IoT only supports MSSQL databases. The way it’s implemented it’s not hard to add engines for other types like oracle, but we haven’t had a use case for that yet and for the user that would be abstracted, so what’s valid for MSSQL is valid for everything else.
For this example, I am going to use a windows pc, with wsl and I am going to use a local mssql database as a container. Microsoft has made a great tutorial on this and that is what I used MSSQL Tutorial. I will assume that you have a CM MES system available to use.
Connecting to the Database
So, first things first, lets create a database. I created a TestDB by running:
CREATE DATABASE TestDB;
Now in the Microsoft SQL Server Management Studio we will have our database:
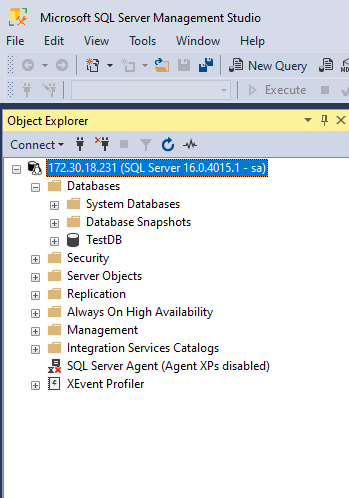
Now, we have a sql database up and running. 👏 👏
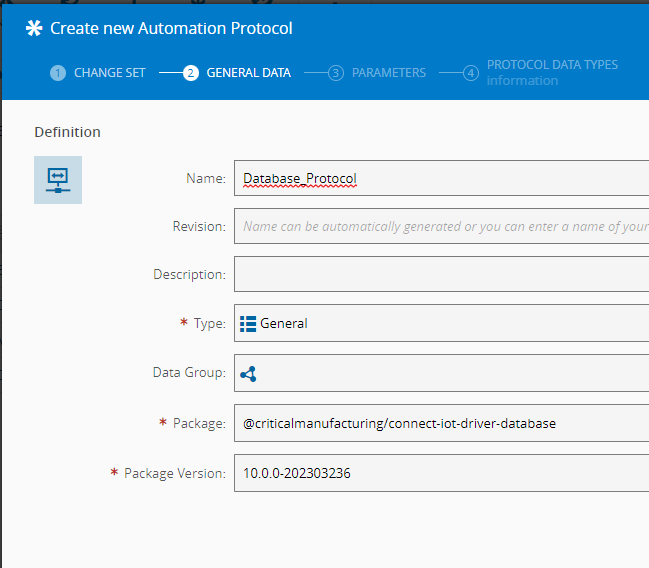
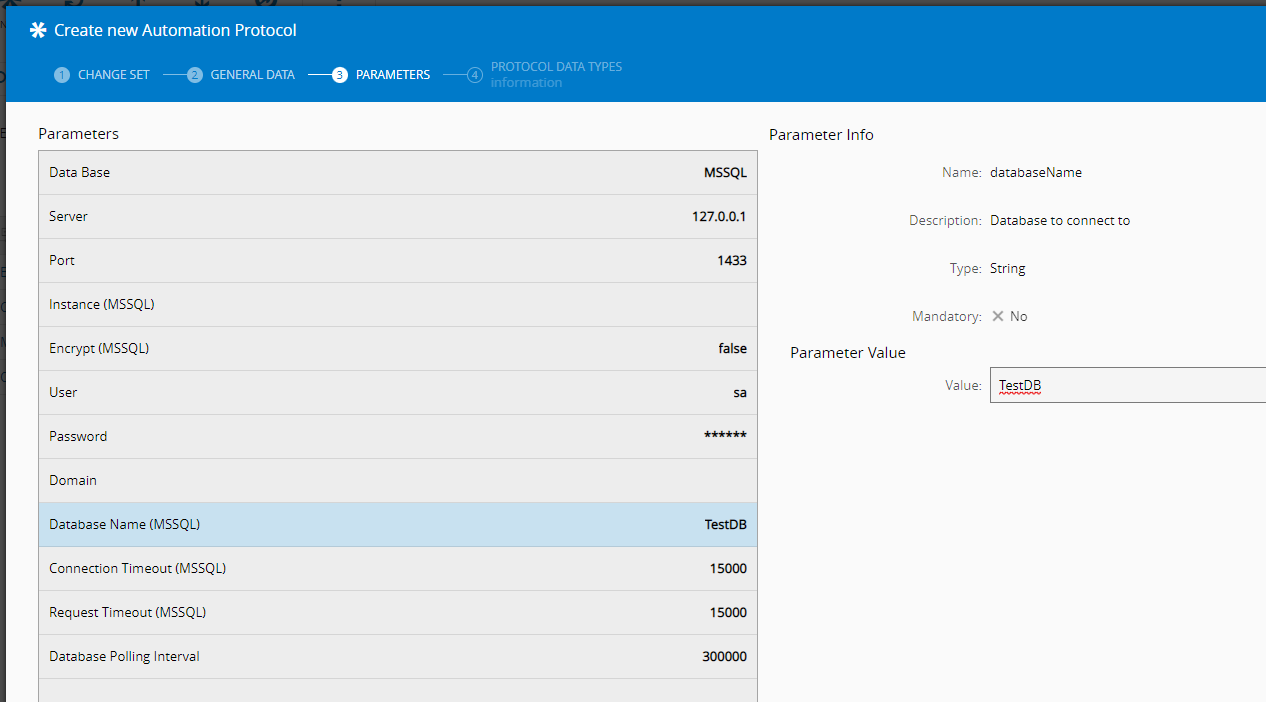
Create - Automation Protocol for the database package. Feel free to already:
- Change server to the correct IP
- Change password to the correct User (i.e sa)
- Change password to the correct Password (i.e 123456789)
- Change database name to the generated database (in this case TestDB)
Create - Automation Driver Definition, for now, just leave everything empty (use the previous created protocol), we just want to test the connection.
Create - Automation Controller (use the automation driver definition created) and also leave as default
Create - Automation Manager and Connect to a Resource
Download and Run - Automation Manager
Executing Queries
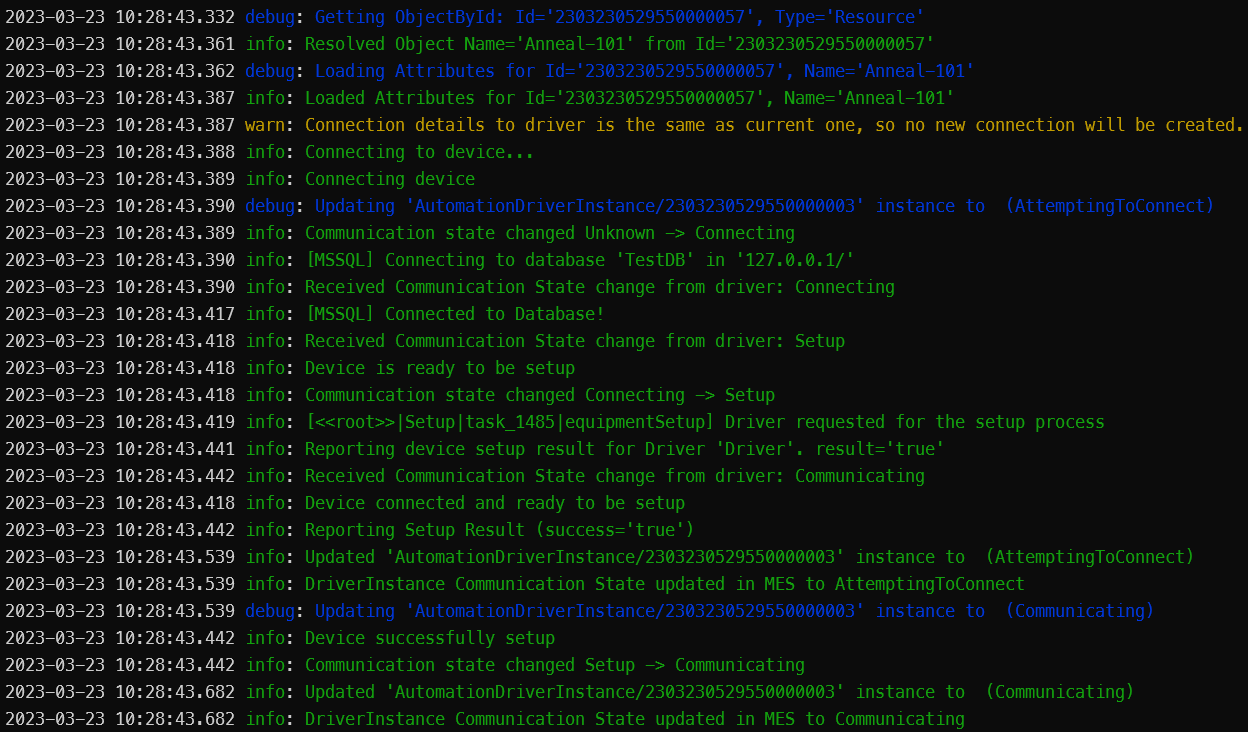
We now have a running Connect IoT Manager and it connects to the database, hurray 👏 👏
Now for the fun stuff, let’s start of by doing a Select Query. But before that run, this will create a table and insert some dummy data:
USE [TestDB];
CREATE TABLE [dbo].TestTable(
	[A] [int] NULL,
	[name] [nvarchar](50) NULL,
	[quantity] [int] NULL
) ON [PRIMARY];

INSERT INTO TestTable VALUES (1, 'banana', 150);
INSERT INTO TestTable VALUES (2, 'orange', 154);
GO
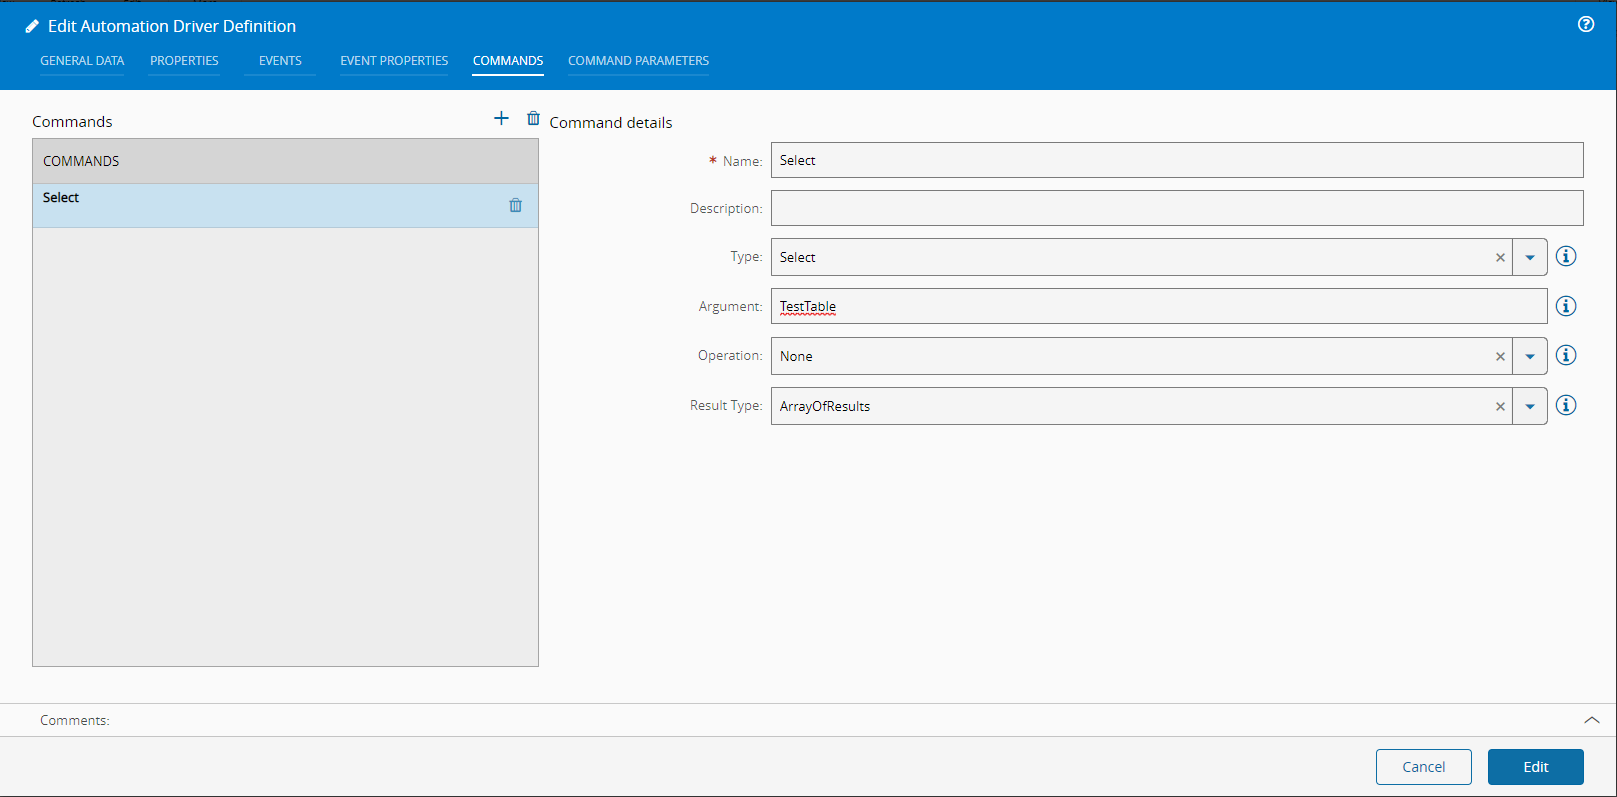
Explaining a bit how this works. A query is a command and a command has parameters. So for example if I have Select A as Magic from TestTable where A = 1. The Connect IoT database driver interprets this as a Command of type Select and argument TestTable. Then it has parameters, in the parameters is where things get spicy.
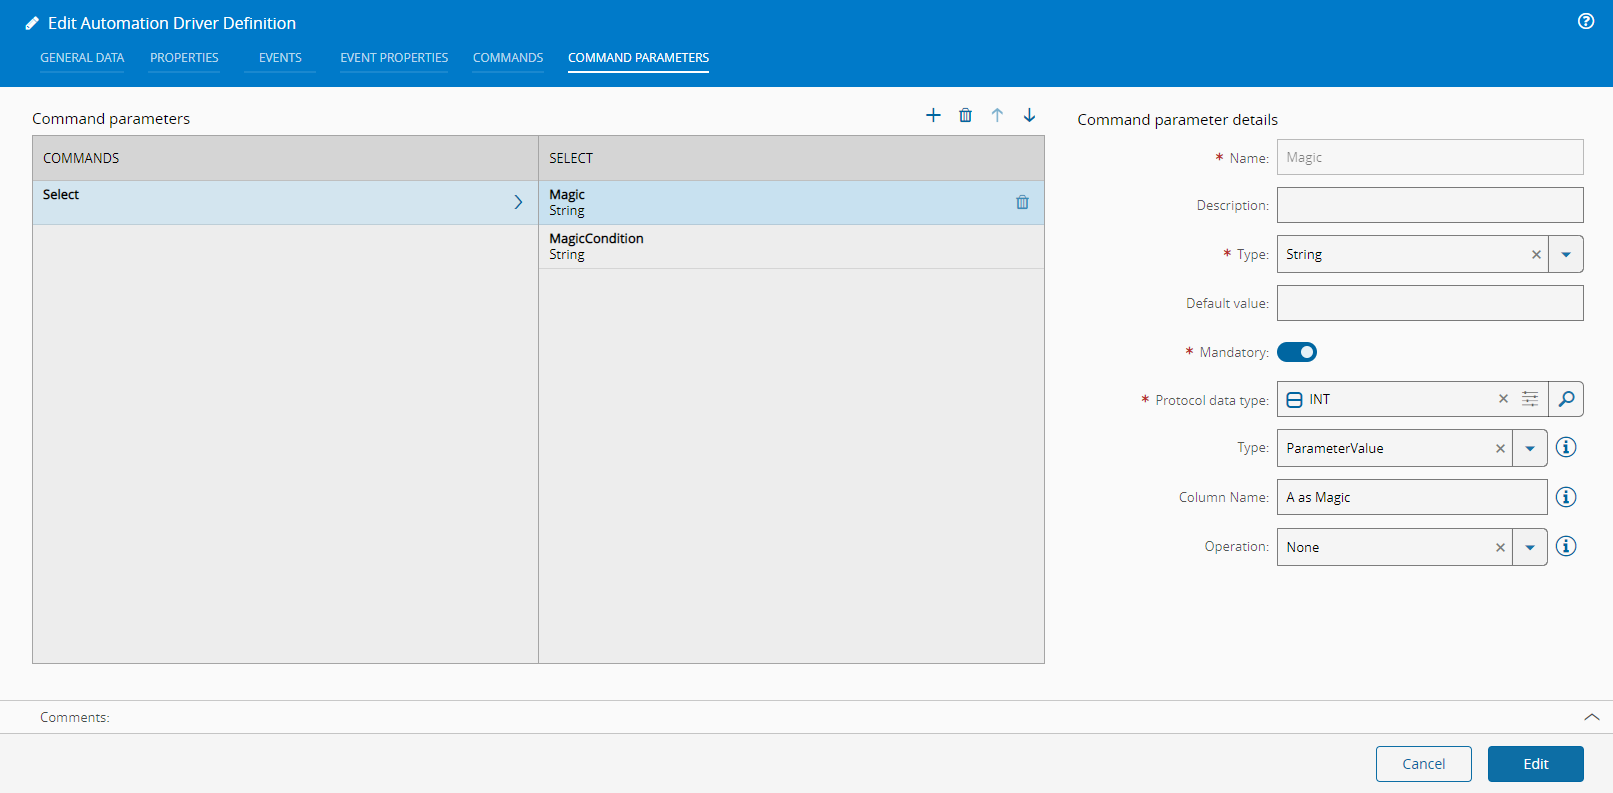
We have two different concepts Parameter Value and Parameter Query, this matches the format of the query, the query has two parts one for defining what you want to Select the Parameter Value and what are the conditions for that selection Parameter Query.
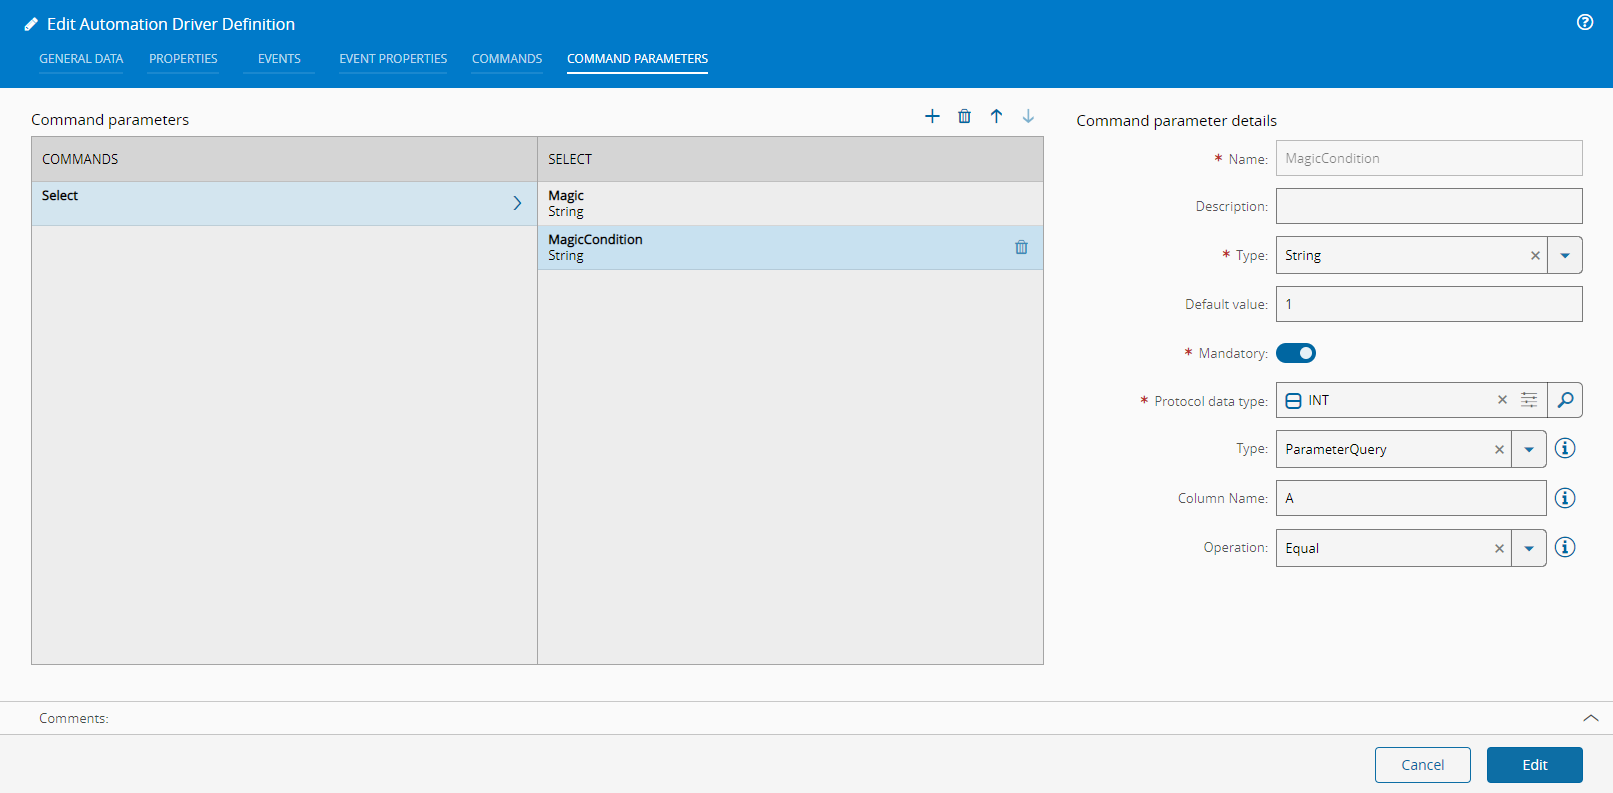
In this example, we would add two parameters, one for the selection and another for the condition. So we can add one, for example Magic of type String, Column Name A and Protocol Data Type INT and is a ParameterValue. Then we need the condition, can be of Name MagicCondition and type String, Protocol Data Type INT, Column Name A and type ParameterQuery. In the ParameterQuery we can say that it has default value 1 and Operation is an Equal.
Key Concept: In other words the decomposition of Select A as Magic from TestTable where A = 1 would be -> [Command Type] [ParameterValue1, ..., ParameterValueN] [Command Argument] [ParameterQuery1, ..., ParameterQueryN].
For defining the output, the database driver gives you 3 modes, one if you have multiple results, so if your query will return multiple rows Array of Results, other if you are expecting multiple outputs of just one row Single Result, which will output a key-value pair of column name and value and finally one if you just want one value of a column Single Value.
Recap
We want a Command Select:
And our two Command Parameters:
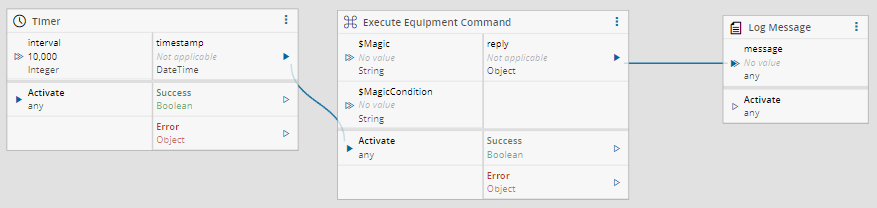
Now let’s go back to the Automation Controller view and edit our workflow. Now we have a new command, so drag and drop the Execute Equipment Command task and we can select our command.
We are just testing it out, so I am going to also drag a Timer task and I’m going to connect my timestamp to Activate the Execute Equipment Command and also drag a Log Message task to log the reply. Now we can start the automation manager and take a look at the console.
Taking a look at the console we can see an array of key-value pairs with column name and the value.

Ok, so we got the basics rolling. There are other commands particularly the Raw command if you want to do very advanced queries without having to declare everything, it’s not advisable, because you lose transparency. Nevertheless, these concepts of ParameterValue and ParameterQuery hold throughout.
Database Polling
I would say 9 out 10 times, you need the database driver to do some kind of polling. Basically, you want to be notified when something changes, either a row changes or a value on a row or a row is added. You could do that already with timers and a clever use of the command tasks, but the driver already implements a configurable way to do that. These will be what the driver considers as events.
It has two modes, FireAndForget and ContinueOnProcessingConfirmation, as the name entails, the fire and forget emits whenever a change is detected, the continue on processing confirmation will only continue looking for changes when the first change is acknowledge or timed out.
For this example, we will focus on the ContinueOnProcessingConfirmation. The use case will be very simple, we want to log whenever a new row is inserted in the table and wait for 1s, before proceeding.
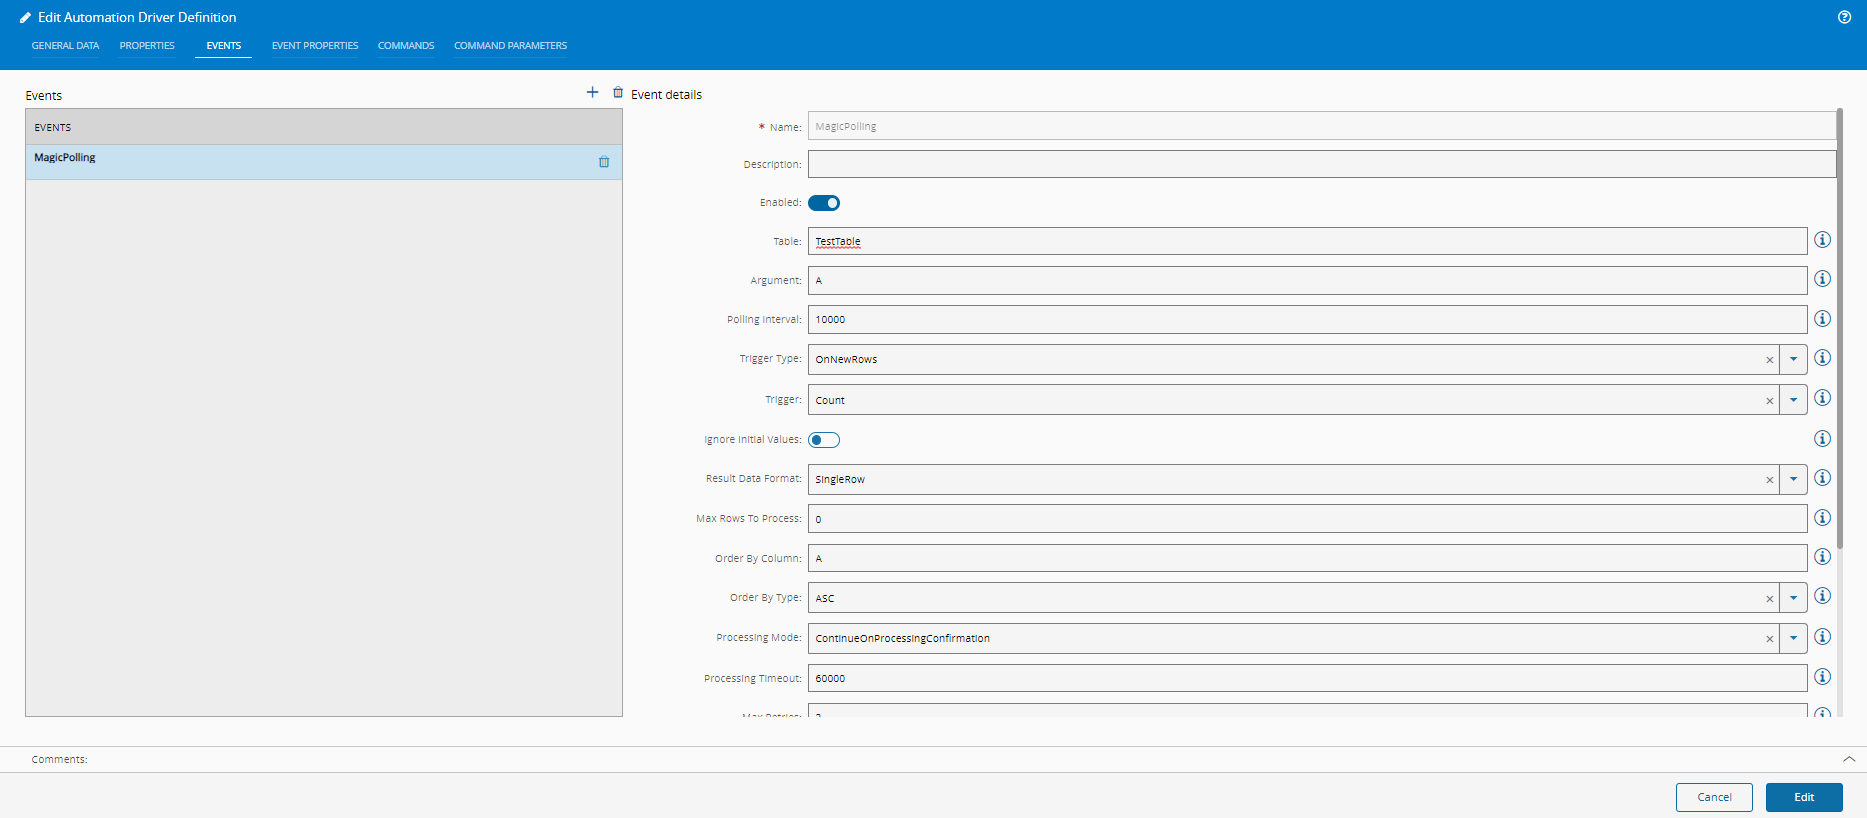
- Create an Event - Go back to the driver definition and now create an event. The event will be looking at our table TestTable, we need to give it a column for it to use as reference (using
*will not work) in our case I usedAand we also have to give a column for the order by column I also gave itA. We are checking for new rows, that is why we selectedOnNewRows. We also wan to to wait for confirmation, so we left ofContinueOnProcessingConfirmation.
- Create a ConfirmDataProcessing Command - Remember that the event will be produced and will await for confirmation of being processed, in order to do that we will create a Command of type
ConfirmDataProcessing. The Command also requires a Command Parameter of typeEventReplywhich will specify to what event you are confirming.


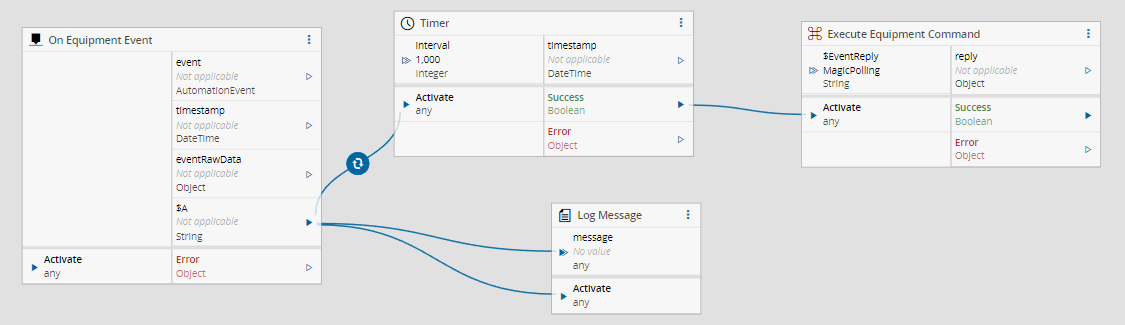
- Edit Workflow - In the Automation Controller worflow add an
On Equipment Event,Timer,Execute Equipment EventandLog Messagetask. On the equipment event task and equipment command should the respective events and commands. Use the event task to log and to activate the timer. TheSuccessof the timer will activate the confirmation command. Change the timer to not auto activate and to be of type sleep, and decrease the timeout.
NOTE: Timers are only activated by a boolean input (1, 0, true, false), so you will need to add a converter to constant true for $A. Timer timeout must be lesser than the timeout of the confirmation timeout, as the driver will discard value if it has finished the defined amount of retries (in our case 3).
- Run Automation Manager - If you already have data in the table you can either go to the driver definition and check the
Ignore Initial Values. I deleted all rows that I had from the previous example and will now insert some rows.
INSERT INTO TestTable VALUES (1, 'banana', 150);
INSERT INTO TestTable VALUES (2, 'orange', 151);
INSERT INTO TestTable VALUES (3, 'grape', 152);
INSERT INTO TestTable VALUES (4, 'apple', 153);
INSERT INTO TestTable VALUES (5, 'tangerine', 154);
INSERT INTO TestTable VALUES (6, 'mango', 155);
INSERT INTO TestTable VALUES (7, 'blueberry', 156);
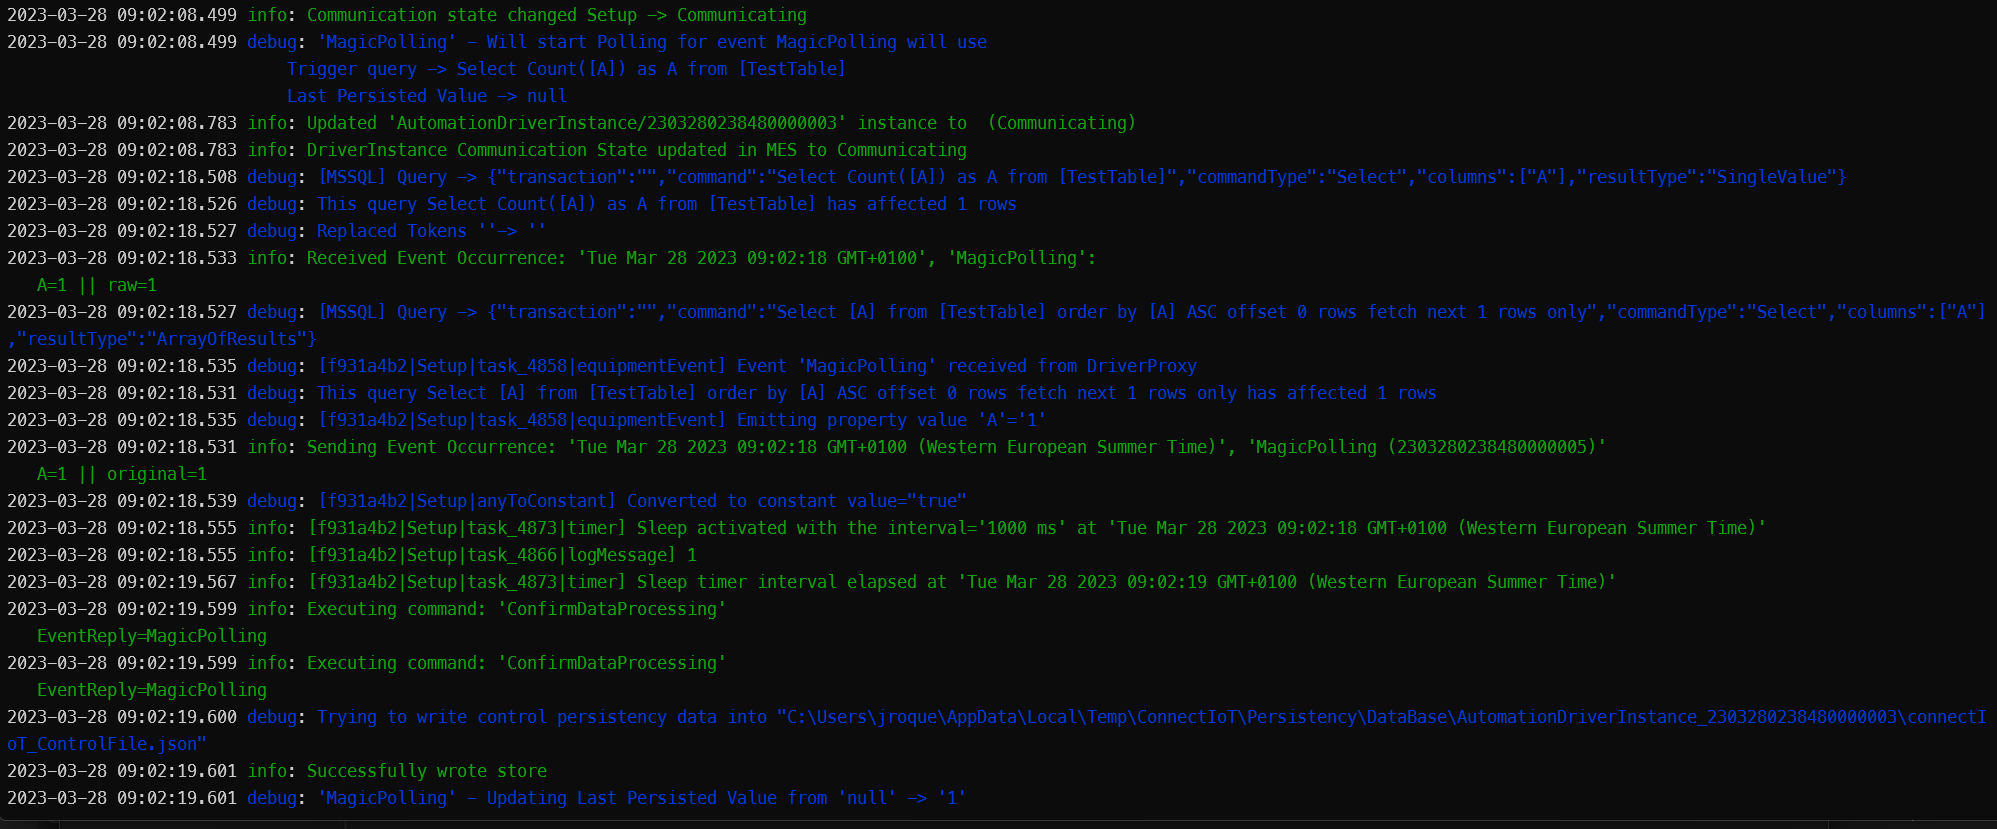
What is happening is the Automation Manager starts and performs the trigger query and sees no values. After that we executed the inserts, so now the database has 7 columns. The driver detects a change and is now going to process one by one and wait for confirmation. We could have it to process all the rows after a change by selecting the result data format AllNew, but normally for confirmation scenarios, you want to process one by one, to assure processing.
This finishes our post, as you can see it is a bit complex when you first look at it, but after understanding the driver syntax it becomes quite powerful.
Author
Hello 👏 , my name is João Roque ✌️
I’ve been working for some years at Critical Manufacturing. I split my time working in the IoT Team and working with the project’s teams. You can visit me at https://j-roque.com/ or check me at LinkedIn
Skills: Connect IoT / DevOps